#10 Agar plates (Wyeast’s Brettanomyces bruxellensis)

Eureka, today yet another post about agar plates and Brettanomyces. This post is about the plating results from streaking some Wyeast’s #5112 Brettanomyces bruxellensis on Sabouraud agar. I first streaked some liquid directly taken from the Wyeast package on a plate and waited for colonies to arise. Then picked a colony after seven days and streaked it on another plate. Lets have a look at the first plate (directly from the package) after six days of incubation (Fig 1).

Fig 1: Wyeast's Brettanomyces bruxellensis on Sabouraud agar after 6 days of incubation

There are some bigger and smaller colonies to be observed (Fig 1). The bigger colonies were off-white colored, milky, raised, even and glossy. The smaller colonies might have formed out of less cells than the bigger ones. So I picked a bit of a big colony a day later and re-streaked it on another plate. I took a picture of this plate after an incubation of eleven days (Fig 2).

Fig 2: Wyeast's Brettanomyces bruxellensis on Sabouraud agar after 11 days of incubation

This time only one kind of colonies could be observed (Fig 2). Morphology like the one before (Fig 1). I added another picture of the same plate (Fig 3). It can be observed that the margins of the colonies get wavy. But the same happens in bigger colonies of Saccharomyces cerevisiae.

Fig 3: Wyeast's Brettanomyces bruxellensis on Sabouraud agar after 11 days of incubation

And yet another picture. The following one is the same plate as shown in Fig 1, but after 18 days of incubation.

Fig 4: Wyeast's Brettanomyces bruxellensis on Sabouraud agar after 18 days of incubation

It’s easy to observe that the smaller colonies in Fig 1, now become bigger ones as well.

As I did other Saccharomyces plates along with the shown ones, I tried to compare the colonies of Saccharomyces and the ones from the Brettanomyces. But I could not observe a real difference in the morphology of the colonies between the yeasts to be able to differ between one and another. For me a colony of Brettanomyces looks like one of Saccharomyces. This could all be due to the agar itself. Other beer bloggers posted about results where they used different types of agar and could differentiate between Saccharomyces and Brettanomyces. One example is BKYeast’s results about selective agar.

The only difference is the time the yeasts needed to form visible colonies. Normally, colonies of Saccharomyces are visible within days (assumed a reasonable amount of yeast is streaked), Brettanomyces colonies were visible after approximately one week. Maybe this can be used to differ between the two yeasts. I should streak the same amount of both yeasts side by side on plates and find out if colonies of Brettanomyces form after Saccharomyces. But now I know at least that Brettanomyces can grow on Sabouraud agar.

If I have some time in the future, I will streak the Brettanomyces on other agar media to try to get a different morphology of the colonies and hopefully be able to have a method available to differ between Brettanomyces and Saccharomyces. So stay tuned!

Brettanomyces bruxellensis microscopy pictures

Eureka, today’s post is all about Brettanomyces bruxellensis from Wyeast. One reason why I started posting about beer and souring bugs in the first place was because of the very limited available microscopy pictures of Brettanomyces. Sure there are some great sources like the Brettanomyces project page or Jason’s pictures to have a look at some Brettanomyces cells. But since I own a microscope myself, why not have a look at the cells myself. So I started with a pure culture of Brettanomyces bruxellensis from Wyeast and took some pictures while looking at them. Pictures of agar plates with the Brettanomyces will follow as well. Well, this post is more or less a picture library from my point of view. Lets begin.

Size of Brettanomyces bruxellensis

First about the size of B. bruxellensis. I loaded a Neubauer counting chamber with some B. bruxellensis cells (Fig 1). The width of one square is 50 µm. This information can now be used to determine the size of a cell. A B. bruxellensis yeast cell has a size of approximately 5 – 7 µm. Lets compare this size to other microorganisms: A typical yeast cell is around 5 µm. The Brettanomyces therefore has a very similar size like a normal yeast cell. This is no surprise since Brettanomyces are yeasts as well.

Fig 1: Brettanomyces bruxellensis in Neubauer counting chamber (width of square = 50 µm)

Morphology of Brettanomyces bruxellensis

Maybe you already observed that the cell morphology are very inhomogeneous (Fig 1). The following pictures are all Brettanomyces bruxellensis with all sort of morphological appearances. I have to apologize for the bad quality of the pictures. But I do not own the appropriate objectives for taking pictures. I hope to take some pictures in the lab with a far better microscope in the future.

Fig 2: Brettanomyces bruxellensis low magnification

Fig 3: Brettanomyces bruxellensis low magnification

Fig 4: Brettanomyces bruxellensis low magnification

So far for the lower magnification. In my opinion there are at least two different morphologies. There are circular cells with a dark spot, or two. And there are the slender cells like the ones in the upper left corner in Fig 4 that stick to other cells. The next pictures are taken at a higher magnification than the ones above.

Fig 5: Brettanomyces bruxellensis high magnification

Some cells look like small lemons. Or at least not perfectly circular (Fig 5). And these cells have a dark spot and some kind of vacuole. These cells look way different from normal Saccharomyces cerevisiae (brewer’s yeast). I have never observed a dark spot in S. cerevisiae before. Maybe this spot is something common in Brettanomyces? We will see about that as we look at Brettanomyces lambicus in a future post. And I have no idea what this dark spot could be.

Fig 6: Brettanomyces bruxellensis high magnification

It gets even more interesting. Lets have a look at the cell in the middle in Fig 6. The one connected to another cell. The lower cell, with the dark spot, looks like every other cell with a spot. But this one seems to be elongated. I assume the elongated cells are just elongated circular cells. This would make sense since there is only one strain of Brettanomyces in there (I hope). But some cells look like S. cerevisiae. Maybe there are some S. cerevisiae in Wyeast’s Activator package?

Fig 7: Brettanomyces bruxellensis high magnification

Here is another elongated cell in the lower left corner (Fig 7). And the typical dark spot can be observed again.

Fig 8: Brettanomyces bruxellensis high magnification

This pictures makes it easy to observe the kind of vacuole (Fig 8). And right in the middle of the picture is a cell with two dark spots.

Fig 9: Brettanomyces bruxellensis high magnification

And here is another shape to observe (Fig 9). This Brettanomyces strain tends to adhere to other cells. What you get is a kind of network of different cells sticking togheter. And the size of the elongated cells is way bigger than all the other cells around them. I have some sort of hypothesis here. I could imagine that two Brettanomyces cells somehow elongate to form bigger cells?

Maybe some of you remember the pictures I took from a beer I fermented with a kind of souring bug. The first one can be found here, the second one here. Now I am pretty sure that Brettanomyces are in the dregs of the BFM La Torpille. The cells in the pictures there look very similar to the ones in Fig 9 and Fig 10.

Fig 10: Brettanomyces bruxellensis high magnification

Fig 11: Brettanomyces bruxellensis high magnification

And there is yet another cell that looks like two cells kind of fused (Fig 11).

I have additional pictures but nothing interesting to see there that can’t be observed in any other pictures above. I am very happy about the pictures because there are some structures which I could not observe in other published pictures of Brettanomyces. One in particular are the adhering cells. Quite amazing stuff in my opinion.

I end this post with a preview about stuff I publish in the future. First, there will be a post about microscopy pictures of Brettanomyces lambicus from Wyeast. Second, two posts about the agar plates with the two Brett strains. And there are some further recipes to talk about as well. So stay tuned. Some really interesting stuff is coming up soon.

Souring bugs fermentation tests

Eureka, today the results from the fermentation tests I did with two yeast strains I isolated from a Girardin Gueuze and a 3 Fonteinen Gueze. The isolation for the Girardin strains can be found here, and the one for the 3 Fonteinen is here. I included the microscopy pictures which I already posted in older posts to get you an idea what kind of yeast I used (Fig 1/2).

Fig 1: Isolated yeast from 3 Fonteinen Geuze

Both yeast strains have a different morphology than typical Saccharomyces cerevisiae. I therefore assumed that these two yeast strains are from a different family like Brettanomyces, Kloeckera, Pichia etc.

Fig 2: Isolated yeast from Girardin Gueuze

Since I do not own the fancy techniques for determining the kind of yeast I have here, I used a different approach. To test if these strains are for example Brettanomyces, I inoculated two starters with these two isolated strains and waited…

02/29/2012: The starters were made with dried malt extract (20 g to 200 mL) and sterilized in a pressure cooker for approximately 15 min. Then let the starters cool down and inoculated them with a colony of each strain.

03/04/2012: Four days after inoculation. See what happened:

Fig 1: 3 Fonteinen bug after four days

Fig 2: Girardin bug after four days


There was a pellicle in the Girardin starter! And something similar in the 3 Fonteinen starter as well! Eureka! And the smell of the starters was just incredible. A lot of funky, sourness (no acetic acid) and cherry notes. Now I am pretty sure that these yeasts that I isolated from the dregs are a sort of souring bugs indeed. I assume that both strains are from the family of Brettanomyces.

03/09/2012: The pellicles are gone and there is a sediment in the starters.

02/24/2012: Tasting of the starters: Both starters smell just incredible. A lot of funk is going on. But no sourness detectable on the palate. I assume that both strains in the starter are indeed Brettanomyces. Both yeasts will ferment some sour beer in the future for sure.

#35 Rusalka Imperial Stout

Eureka, todays recipe is a really big one. And a really tasty one as well. More about that later on. Well, I did an Irish Stout batch once and there was a big yeast cake left in the fermenter. Instead of dumping the whole cake, I decided to use the yeast for a really big Imperial Stout. So I designed a Russian Imperial Stout recipe and planned to split the batch before the fermentation to try different things with each share. This post is about one share of the recipe. The second share will be discussed in another post (see batch number #36 Russian Imperial Stout).

Normally, I do not invest a lot of time thinking about a name for one of my beers. But I had to since I entered this particular brew at a homebrew competition. So I went with Rusalka Imperial Stout. Rusalka by the way, is a female water ghost mentioned in the Slavic mythology. Lets go through the recipe:

Recipe: Rusalka Imperial Stout
Numbers: Volume [L] 30 (8.0 gal)
Original gravity 18°P
Terminal gravity 5.6°P
Color Around 210 EBC
IBU 87 IBU
ABV > 6.9 %
Grains: Pale Ale malt (6.5 EBC) 7.0 kg
Wheat malt (4 EBC) 0.9 kg
Roasted barley (1150 EBC) 1.1 kg
Carafa Typ 1 (900 EBC) 1.1 kg
Crystal (120 EBC) 0.4 kg
Hops: Northern Brewer (10% AA) 48.1 g and boil for 60 min
Northern Brewer (10% AA) 37.1 g and boil for 30 min
Northern Brewer (10% AA) 18.2 g and boil for 15 min
East Kent Goldings (5.1% AA) 55.9 g and boil for 15 min
East Kent Goldings (5.1% AA) 83.3 g and boil for 3 min
East Kent Goldings (5.1% AA) 57 g for dry hopping
Yeast: #1084 Irish Stout
Water: Burgdorf Mash: 29 L (7.7 gal), sparge: 46 L (7.9 gal) @78°C (172°F)
Rest: Mash in @63°C (145°F), 90 min @ 65°C (149°F), 10 min @ 78°C (172°F)
Boil: Total 60 min
Fermentation: Primary 9 days @ 20°C (68°F) in a plastic fermenter
Secondary 15 days @ 20°C (68°F) in a plastic fermenter
Maturation: Carbonation (CO2 vol) 2 (carbonated with table sugar)
Maturation time Month to years

Fig 1: Mash is resting.

05/28/2011: A big brew day begins. All went according to the protocol until the fly sparging. I left the sparging process unattended and as I came back, the kettle for the boil was already full. So I had to stop lautering at 4°P. I would stop sparging way before 4°P in the future. So I removed 10 L (2.6 gal) of the wort and boiled them for 90 min in another kettle.

Because of the volume, I boiled the wort 30 min prior to the first hop addition. Then added the hops according to the protocol. After a whirlpool rest of approximately 10 min, I cooled the wort down to 20°C (68°F) and split the batch. 20 L (5.3 gal) were fermented with the #1084 Irish Stout yeast (270 billion yeast cells) and 10 L (2.6 gal) with a Safbrew S33 dried yeast. I will post about the Safbrew share in another post. So far for the brew day.

06/03/2011: Racked the 20 L (5.3 gal) share and split the batch again into two smaller fermenters (10 L (2.6 gal) each). Then added 19 g of East Kent Golding hops for dry hopping to each share and 25 g of medium toasted French oak chips to just one share. I will label the share without wood as #35, the one with wood as #35W.

06/18/2011: Gravity: 5.6°P. Bottled both shares (#35 and #35W) to a carbonation level of 2 vol carbon dioxide. The bottles mature in the cellar since then. I plan to drink this brew after a year of maturation.

Fig 2: Collecting the first runnings

What I like about brewing dark beers is the depth of dark color you can get in a mash and during the sparging process. But the color of this particular brew was just beyond every brew before. The deep dark color was just amazing (Fig 2). And the Irish yeast went through the wort without any problems and reached a gravity of nearly 5.6°P after a few days already.

12/12/2011: Nearly a half a year passed since bottling. I took each a bottle of #35 and #35W to a homebrewer meeting. The #35 was pretty tasty already and some of the other homebrewers really liked it. What a flavor profile: chocolate, coffee, hoppy and roasty notes. The #35W is still too young because the wood character was too overpowering and somewhat astringent. Furher maturation is required…

03/17/2012: The beer is nearly nine month old. As I already mentioned in the recipe post about the Gielis Tripel, my brother and I entered each one beer at a homebrew competition. My brother already won a first place with his Gielis Tripel. And I entered the #35 Rusalka Imperial Stout in the Dry Stout category (there was no Imperial Stout category). What happened is just amazing. I not only won the first prize in the Irish Dry Stout category, but reached the highest tasting score at the whole competition as well. This is just amazing. We both won first place at our very first competition!

Fig 3: Rusalka Imperial Stout wins SIOS Trophy 2012 in the Irish Dry Stout beer category.

I will post the tasting results in a separate post in the future. Unfortunately, there are just a few bottles left now of this particular batch. I already planned on doing a second bigger batch. Now I hope to be able to replicate the beer in a second batch… and maybe introduce some Brettanomyces as well?

#40 Gielis Tripel

Eureka, its time for another recipe. This one is a bit different compared to all the other recipes. From time to time my brother and I brew a batch together. And there are some times were my brother makes one on his own. My brother really likes Belgian Tripels and especially the one from Westmalle. So he decided one day to try to brew a Tripel on his own. We grabbed a beer and designed a Tripel recipe and below is what we got at the end. You might have wondered about the name of the beer already. Johan Gielis is a Belgian engineer, mathematician and entrepreneur. One particular thing he found out is the superformula which can be used to describe different symmetries. There is no story “how we came up with this name”. Another interesting fact about this recipe can be found below.

Recipe: Gielis Tripel
Numbers: Volume [L] 25 (6.6 gal)
Original gravity 18.7°P
Terminal gravity 3.1°P
Color Around 13 EBC
IBU 36 IBU
ABV 8.7 %
Grains: Pilsner Malt (4 EBC) 6.9 kg
Wheat Malt (4 EBC) 0.12 kg
Munich Malt 1 (14.5 EBC) 0.2 kg
Dark candy sugar (425 EBC) 0.2 kg (added to the boil)
Table sugar 0.6 kg (added to the boil)
Hops: Styrian Goldings (6,1% AA) 75 g and boil for 60 min
Saazer (3.5% AA) 24 g and boil for 5 min
Yeast: #3787 Trappist High Gravity
Water: Burgdorf Mash: 20 L (5.3 gal), sparge: 30 L (7.9 gal) @78°C (172°F)
Rest: 2 steps Mash in @66°C (151°F), 60 min @ 66°C (151°F), 10 min @ 78°C (172°F)
Boil: Total 75 min
Fermentation: Primary 7 days @ 18°C (64°F) in a plastic bucket
Secondary 14 days @ 18°C (64°F) in a plastic bucket
Maturation: Carbonation (CO2 vol) 2 (114 g table sugar to 28 L of beer)
Maturation time Months

Fig 1: Mash is resting

09/17/2011: Brew day. It seems that all went according to plan. Both sugars were added at the end of the boil. Then pitched a #3787 Trappist High Gravity yeast that came straight out of a previous batch. The beer was racked in a secondary fermenter after seven days.

Fig 2: Dark candy sugar addition to the boil

10/16/2011: Bottled the beer to 2 vol of carbon dioxide with some table sugar. Then left the bottles carbonate at 18°C (64°F) for 14 days and store the bottles at 15°C (59°F) since.

03/17/2012: My brother and I decided to enter each one beer at a homebrew competition this year and so we did. By the way our first competition ever. My brother chose to enter his Gielis Tripel, and I went with an Imperial Stout recipe. There are only two homebrew competitions in Switzerland every year. One is held by a homebrew supplier called SIOS, and another one held by the Swiss Homebrew Society (SHS). So we decided to enter our beers at the SIOS Trophy 2012. There were a total of twelve categories and a total of 131 beers entered. After two tasting rounds, the winners were announced. My brother won a first prize in the Abbey beer category (Klosterbier in German) with his Gielis Tripel which had exactly the same points as another beer. So the first prize was shared with another brewer. Congratulations to the other brewer for his Abbey beer (will not mention the brewers name to keep his privacy). Only the best beer in each category gets a Trophy (bottle in Fig 3). This was my brothers second batch ever… and already a first price! So the recipe above is an award-winning one! And my brother is an award-winning brewer already. That’s pretty cool. Now I know that at least one of us can brew really great beers. What about my Imperial Stout? I will tell you about that in another post soon.

Fig 3: Gielis Tripel wins SIOS Trophy 2012 in the Abbey beer category.

I will post the tasting notes (tasting panel from the competition and my own) in another post. Stay tuned!

Wheat yeast comparison results Part 2 (Tasting)

Eureka, this is the second part of the results of the wheat yeast comparison experiment. The background of this experiment can be found here. No further introduction, let’s get straight into the results.

Tasting results
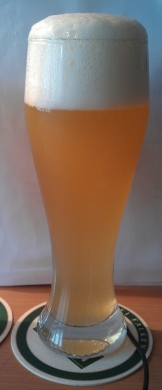
Fig 1: Wheat beer fermented with Wyeast's #3056 Bavarian Wheat Blend

The tasting was done by a group of three people to determine different aromas and flavors of the different beers. The beers were tested in pairs of three over several days to prevent any exhausted palates.

To make it easier for comparison, the following aroma and flavor profiles were evaluated:

Aroma: Banana, phenolic, bubblegum, fruity (apple, citrusy, strawberry, undefined fruits)

Flavor: Citric, phenolic, fruity, bubblegum, banana

The intensity of the individual aroma and flavors were described as following: 5 (high amount), 4 (medium), 3 (little), 1 (hints) and 0 for absent note. The overall impression was evaluated on a scale from 0 to 5 with 5 being the highest rating. At last, the beers were categorized into cloudy/ not cloudy. To evaluate the clarity, the beers were first poured right from the bottles and the clarity was evaluated. Then the rest of the beer was poured including the yeast sediments.

First about the similarities of all the beers. The color of the beers was more or less the same. We could not detect any differences. A typical picture of the appearance can be seen in Fig 1. The mouthfeel of the beers was light to medium with an average carbonation level. The aftertaste was short to medium lasting and the balance (sweet to bitter) of the aftertaste was more on the sweet side than bitter one. Differences are discussed below.

I mentioned that I did two fermentations for each of the strains. I turned out that some of the replicates had a different head stability and some had signs of oxidation. We therefore poured each replica side by side and evaluated both. If there were some off-flavors detectable with one of them, we just used the one without any flaws for the results below. Luckily, there was at least one flawless replica for each of the strains.

I will first talk about the flavor and aroma profile of the different yeast strains and then talk about the clarity and the overall ratings.

#3068 Weihenstephan
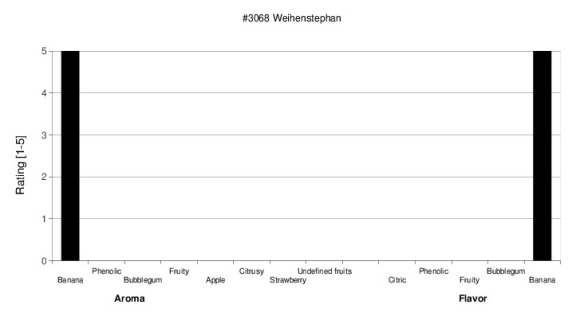
Fig 2: Wyeast's #3068 Weihenstephan aroma/flavor profile

I used this yeast strain in the three batches I did as a control yeast to determine any differences between the three batches. But the beers from the three different batches fermented with the #3068 Weihenstephan yeast all had the same profile: huge banana (Fig 2). Nothing else! The differences between the batches were very minimal. This concludes that the beer of the three batches were very comparable. And this allows to compare the yeasts from the different batches with each other since there are no differences in the basic beers.

Wyeast describes this particular strain to give banana and clove notes. Reasons for the lacking clove note are discussed at the end of this post. All in all a very beautiful yeast. The beers were all cloudy. No surprise since this is a low flocculating yeast strain. Pretty refreshing and the banana really belongs into such a beer in my opinion. Overall rating: 4.

#3056 Bavarian Wheat Blend

Fig 3: Wyeast's #3056 Bavarian Wheat Blend aroma/flavor profile

The beer fermented with the #3056 Bavarian Wheat Blend had a distinct phenolic and fruity (strawberry) flavor (Fig 3). Wyeast describes this strain to be estery and phenolic. This beer was cloudy (medium flocculating yeast strain). Reasons for the lacking clove note are discussed at the end of this post.

I already tried this particular strain before and had the strawberry notes in there as well. This strain is not my favorite one because of the strawberry note. This strain could be used in a beer where a strawberry note is desired. Maybe in a fruit infused wheat beer? Overall rating: 3.

#3638 Bavarian Wheat
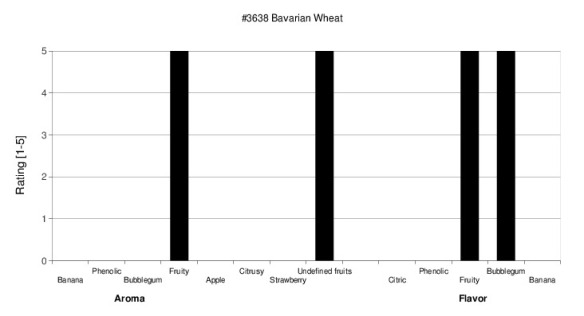
Fig 4: Wyeast's #3638 Bavarian Wheat aroma/flavor profile

Fermenting the wheat beer with Wyeast’s #3638 Bavarian Wheat leads to a fruity beer. We could not assign a fruit to the detected fruit aroma. Maybe a lichi note? But lot of fruits and bubblegum in the flavor (Fig 4). Wyeast’s aroma/flavor description for this strain are apple, pear, plum esters in addition to a dominant banana character. The esters are complemented nicely by clove and subtle vanilla phenolics. The lacking banana component could be due to different pitching rates or fermentation temperatures. The beer was cloudy (low flocculating strain).

I am a bit surprised about this strain because of the lacking banana notes compared to the #3068 Weihenstephan strain (both fermented at the same temperature). Maybe this strain produces less banana esters than the #3068 Weihenstephan? This strain is not my favorite one as well. I still prefer the #3068 Weihenstephan. Overall rating: 3.

#3333 German Wheat

Fig 5: Wyeast's #3333 German Wheat aroma/flavor profile

First, the aroma and flavor profile of this beers was lower than all the other strains (Fig 5). We could detect some banana, fruity and again, strawberry notes. And fruits and banana in the flavor. There were some sherry notes as well and the beer was pretty dry compared to the others. This could be due to a higher attenuation level of this strain compared to the other strains.

Wyeast’s description: This yeast strain produces a beautiful and delicate balance of banana esters and clove phenolics similar to the popular Wyeast 3068. We could not detect any phenolic notes in this beer. And in our opinion, the banana/ phenolic balance was not similar to the #3068 Weihenstephan strain. Once again, reasons for the lacking clove note are discussed at the end of this post. This beer was not cloudy. Wyeast recommends this strain for Kristallweizen because of its high flocculation.

Well, the strawberry note does not fit my palate very much. And the subtle aroma and flavor notes do not help this beer as well. Maybe a different fermentation temperature could change this. Overall rating of 3.

WB-06

Fig 6: Safbrew's WB-06 aroma/flavor profile

Now, how do the dried yeasts compete against the liquid yeasts? This beer had a very fruity and apple driven aroma (Fig 6). And some fruity and citric (lemony) notes in the flavor. Safbrew describes this yeast to give a subtle estery and phenol driven flavored beer. Lets say the fruity notes we picked up belong to the subtle estery note. But we could not pick up any phenolic notes. Once again, reasons for the lacking clove note are discussed at the end of this post. This beer was clear (although stated to be low flocculating). Although the attenuation of this particular strain was above average (see first part of results), the beer was not drier compared to the other beers. Overall rating: 2. Very odd flavor profile in my opinion. And not a really refreshing beer either.

One additional goal of this whole experiment was to determine whether Wyeast’s #3068 Weihenstephan strain is the same as the WB-06. Well, this can hereby be confuted. The 3068 gave an overpowering banana note, the WB-06 did not.

Danstar Munich
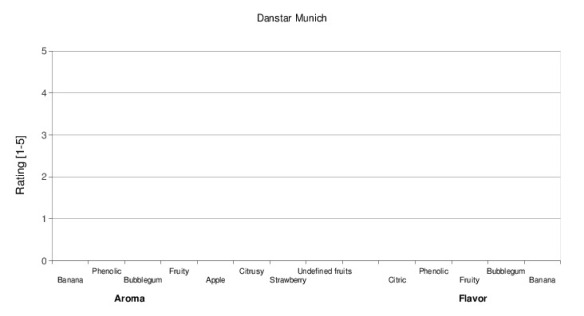
Fig 7: Danstar's Munich yeast aroma/flavor profile

There were just some sherry notes and some signs of oxidation detectable (Fig 7). There should be banana notes as stated by Danstar. But we could not pick up any banana notes at all. The beer was clear (medium to high flocculating strain). I will not further comment this strain because of the possible oxidation of this beer. I assume that there was a problem in the fermentation process or bottling in both replica.

Burgdorfer Weizenhefe

Fig 8: Burgdorfer Weizenbierhefe aroma/flavor profile

Now the last typical wheat yeast strain. This one was isolated from a local wheat beer. And there were some banana, fruity and strawberry notes again (Fig 8). But none of these aromas in the flavor. The beer was cloudy. This strain is less interesting than some of the other strains in the experiment. Overall rating: 2.

So far for the typical wheat yeast strains for a typical German wheat beer. Lets move on to some other wheat yeast strains.

#1010 American Wheat
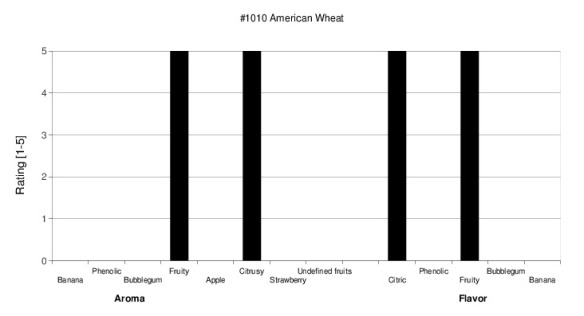
Fig 9: Wyeast's #1010 American wheat aroma/flavor profile

The first strain we discuss is Wyeast’s #1010 American Wheat strain. We could pick up huge fruity and citrusy (lemony) notes in the aroma and the same notes in the flavor (Fig 9). This beer was cloudy. Wyeast describes this strain as following: produces a dry, slightly tart, crisp beer. Ideal for beers when a low ester profile is desirable. Well, the beer was kind of dry but the ester profile was in my opinion a bit higher than stated. But a really refreshing beer indeed and something different from the banana and phenolic yeast strains. This strain could be a really good one for lighter beers for the summer such as a Pale Ale. And the lemon note is really nice. Overall rating: 3.

#3942 Belgian Wheat

Fig 10: Wyeast's #3942 Belgian Wheat aroma/flavor profile

And the last strain in this experiment was the Belgian Wheat strain. Well, what would you expect from a Belgian yeast strain? Phenolic, phenolic and again phenolic notes. And that’s more or less what was in this beer. And some fruity notes in the aroma (Fig 10). Wyeast describes: moderate esters and minimal phenolics. Apple, bubblegum and plum-like aromas blend nicely with malt and hops. Well, the tasting panel was not that far away from Wyeast’s description. I have to say that I really enjoyed this particular brew. It was still very refreshing but had a very different flavor profile than a typical German wheat beer. This beer was again cloudy (medium flocculating). This strain is my favorite non-German wheat yeast strain. A pretty cool strain in my opinion. Overall rating: 4.

Overall discussion

The descriptions from the suppliers were very similar to the taste panels opinion. Sometimes, the beers had less or none phenolic notes although stated by the suppliers. This difference could be due to a different fermentation temperature or different pitching rates. In fact, at the same time as I was writing this post I came along an interview with an employee from Wyeast. The interview can be found here. In my opinion one of the best and most educational interview ever. Check it out. Owen Lingley mentions that underpitching of wheat yeasts can lead to a more prominent banana character. Overpitching leading to a more phenol driven beer. And I guess this is the answer to the lacking phenolic notes in the beers because I intentionally underpitched all of the beers. And the results kind of confirm Owen’s statement. One message to take home: if you want huge banana character, underpitch. If you want phenolic notes in your wheat beer, then overpitch. Increasing the temperature will lead to an increasing ester production. Maybe underpitching and raising the temperature will further increase the banana character?

Another flavor was determined several times: strawberry. I already mentioned that I detected such a flavor in a previous wheat beer which was fermented with the #3056 Bavarian Wheat Blend. But we could detect strawberry notes in the #3333 German Wheat and the isolated Burgdorfer Weizenhefe as well. I have no idea about the background how this flavor got in there.

What about my favorite strains? Well, my favorite strain before this experiment was the #3068 Weihenstephan strain. The #3068 Weihenstephan is still my favorite strain but there are some other strains which are really interesting. There is the #3942 Belgian Wheat and the #1010 American Wheat strain that fascinated me the most. And there is the #3638 Bavarian Wheat which I will use in another wheat beer soon.

Summary

The goal is achieved, the different yeast strains are described. And the WB-06 seems to be a different yeast strain than Wyeast’s #3068 Weihenstephan yeast strain. Another thing the effect of pitching rates and fermentation temperatures. After a yeast strain is selected, the character of the particular yeast strain can further be influenced by the pitching rate and the fermentation temperature.

So, this was a really huge experiment. It took me three batches and a lot of bottling time to get the different beers into bottles. And then came the fun part, the evaluation of the different flavors and aromas. Then another huge working load to blend all the data together and at last, write about it. Now I am really fed up with wheat beers for a while…

Please feel free to comment below. I really appreciate all the comments and thoughts.