Yeast banking – #2 Agar plates

Eureka, today I proceed with the series about yeast banking at home (or in a lab). The introduction (previous post) about yeast banking can be found here. Lets begin with technique number one, yeast banking with agar plates.

Description of the technique

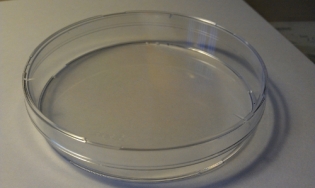
Agar plates are basically petri dishes (Fig 1) which are filled with a gelatinous media called agar media. For that you mix yourself a agar media, heat it up and sterilize it and then pour the media in the petri dishes. As the media cools down, it gets hard and dry.

Fig 1 : Petri dish (94 mm in diameter)

The agar media usually consists of nutrients for the microorganisms to grow and agar agar (or just agar) which makes the whole agar media gelatinous. Agar is very similar to gelatin which is used in cooking. More about the agar media later on.

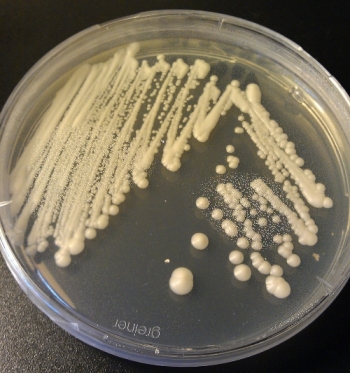
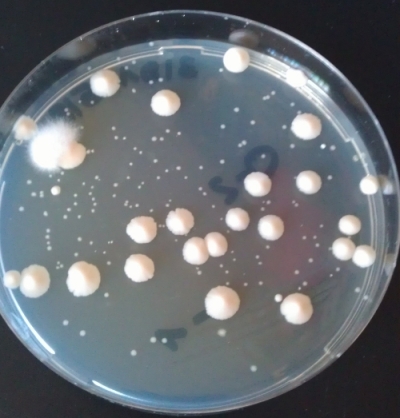
Agar plates are very widely used in biology labs to cultivate microorganisms such as bacteria and yeasts. For that you basically distribute a liquid sample (also known as plate or streak) with your suspended microorganisms on a agar plate and wait for colonies to arise (Fig 2). The colonies are the spots you can observe. Colonies arise from one single cell (in theory) and form a colony due to the increasing amount of cells at the same spot and become visible. Meaning, a colony are a lot of cells originating from a single cell. If you plate a defined volume of your sample on a plate you can even determine the amount of microorganisms you have in your sample. Agar plates are therefore a very basic technique in microbiology.

Fig 2: Agar plate with yeast colonies

Not only can you cultivate the microorganisms but differ between some of them if you choose the right kind of agar. Meaning, some bacteria/yeast can grow on one kind of agar and others can’t. The trick here is to use the right kind of agar. You can even add further substances such as antibiotics to avoid bacterial growth on the plate, add dyes to watch for colored colonies, add pH-indicators to watch for colonies producing acids or add further substances to avoid yeast growth… the possibilities are huge.

Lets go back to the yeast banking. Agar plates can be used to bank yeast as well (what a surprise). The easiest agar for homebrewers is malt agar which is based on dry malt extract and agar agar to get the gelatinous consistency. Recipes can be found on BKYeasts blog as well as other agar media recipes. Malt agar is not the only way to go. I use Sabouraud agar for example which is a special agar to cultivate yeasts. More about Sabouraud and my agar plating technique can be found here in a very scientific post. In the end, it does not mater which kind of agar you use as long as yeasts can grow on them. The technique and material stay the same. For beginners, malt extract agar is probably the best way to go since dried malt extract is available at homebrew suppliers. A recipe for malt agar can be found on BKYeasts blog (look for malt extract/ wort agar). Don’t bother about the pH. You basically need dried malt extract, agar agar and a way to get the whole media sterile. Unfortunately, I can’t tell you about any sources for agar. In my case, agar is available at supermarkets because agar is used in baking as well.

Material

For yeast banking with agar plates you need:

– Petri dishes (available in glass or plastic)
– Source to get the agar media sterile (for example a pressure cooker)
inoculating loop (DIY works very well)
– Source to flame the inoculating loop
– Agar (aka agar agar)
– Dried malt extract (aka DME)

Concerning the Petri dishes. Petri dishes are available at Amazon for example. Either go for glass or plastic dishes.

  • Glass petri dishes can be heat sterilized in a pressure cooker or oven. Are more expensive than plastic ones. Can be re-used.
  • Plastic petri dishes are normally just used once. They usually melt during a heat sterilization step… Plastic dishes are available as sterile and non-sterile ones. Some dishes have vents to allow gas exchange. In my opinion vents are great. However not necessary.

Next thing to remember is buying petri dishes with a cover. Concerning the diameter. There are different sizes of petri dishes available. Common diameter for dishes is about 94 mm. However, you can certainly buy bigger or smaller ones if you want. I use 94 mm diameter non-sterile plastic dishes because I do a lot of platings and do not sterilize the plates before use. Don’t had a problem with contaminations so far. If you plan on doing a lot of platings, get yourself some plastic dishes.

Source to get the agar media sterile. This is a very important step to consider. Your media has to be sterile and heated up to a boil. This is important since the agar will otherwise not be dissolved properly and not gelatinize the agar media. A pressure cooker would be the best thing to have since the pressure will prevent any boil-overs.

Inoculating loops can be bought from Amazon as well or make one yourself. It is basically a metal loop… which has to be heated up before you distribute the yeast on the plate. This is done by a flame. Gas burners, ethanol burners, candles or any other flame will do the job. For further information please have a look at the Braukaiser’s post about how to make plates and slants.

Preparation

1. Make sure you have all the necessary equipment ready

2. Make some plates according to the Braukaiser’s post. I do not want to explain all the necessary steps in this blog since others have covered this topic already.

Just remember, the Braukaiser uses glass petri dishes which can be sterilized in a pressure cooker. If you work with plastic dishes you need to sterilize the media first since the plates will probably melt during the sterilization process. On the other hand, if you sterilize your glass petri dishes with the media the plates could be very moist afterwards. And water on the plate can smear your yeast colonies afterwards… You will not get nice colonies.

3. After the plates cooled down, they are ready to be streaked. Once again, one technique is described on the Braukaiser’s blog on inocculating plates and slants. For the visual people, have a look at the following YouTube video on How to Streak a plate.

4. Leave the plate(s) at a warm plate for some days until colonies appear. If you only have nice colonies such as the one shown in Fig 2, you basically mastered the agar plating technique already. Well done!

Bank the yeast

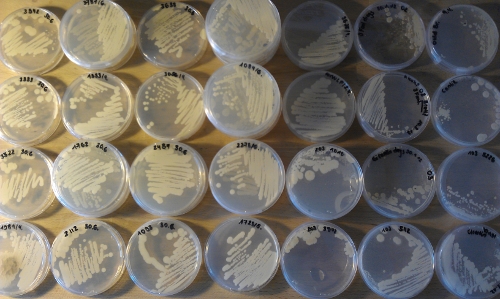
After colonies appeared, seal the plate with a tape and the plate is ready for storage. The tape prevents the plate to dry out and the introduction of any contaminations. However, don’t be too sure about the tape. Even sealed plates can get a contamination at some point.

Fig 3: Banking yeast with agar plates

Storage

Store the plate in a refrigerator at approximately 6°C (43°F). Avoid temperatures around 0°C (32°F) or below. You can even store the plates at warmer temperatures. However, in this case a lot of maintenance work will be necessary. At warmer temperatures the yeast still grow relatively fast and will sooner or later form very big colonies. Maybe even cover the whole agar plate. In this case, you need to pick a yeast colony and plate it on another plate (also known as re-streaking or re-plating). Incubate the plate again until colonies appear. Then pick another colony and plate it on another plate… You see where this is going. At cooler temperatures above freezing temperature, the yeasts will grow relatively slow. A re-streaking will be necessary at some point as well. However, the time between theses platings will be much longer compared to plates stored at ambient temperatures.

Reanimation

This is rather easy. Just pick a colony and make a small starter. More about this process in more detail again on Braukaiser’s blog about growing yeasts from a plate.

My experiences with this method

What are the advantages/disadvantages for this method as a banking tool?

Advantage Disadvantage
Rather easy method  Plates needs storage space
Not a lot of equipment necessary  Contaminations happen
Contaminations can be visible  Lot of maintenance work necessary
Agar plates can be used for other projects  Not a long-term storage method

Let me talk about the advantages first. Compared to some other techniques in yeast banking this one is rather easy to do and you do not need sophisticated equipment. In addition, contaminations in your yeast can be visible very easy. This can be seen if any other colonies (different look) appear on the plate. If there are only one kind of colonies on the plate, the chance is high your yeast is still pure. However, a contaminations does not have to be visible… Some are not visible on the plates. Therefore, contaminations can be visible. At last, you can use the agar plates for other projects such as isolating brewer’s yeast or wild yeasts from commercial beers.

Disadvantages of the agar plates yeast banking method. If you have a lot of strains to bank, keeping them all on agar plates will use a lot of storage space. And a lot of maintenance work since you have to re-plate them periodically. And every re-streaking is an opportunity for a contamination to sneak in. As already mentioned, even a taped plate can get infected at some point. For all these reasons, banking yeasts on agar plates is not a long-term storage method in my opinion.

You might ask yourself why I wrote a post about agar plates as a banking tool after all. In my opinion, if you only use limited yeast strains (lets say three different ones) banking them on agar plates might work really well. Just pick a colony from a agar plate, make a starter and re-streak another plate with the starter’s liquid. With this method you do not only have fresh yeast on a plate but the opportunity to check for any contaminations in the starter as well.

If you do want to get into yeast stuff yourself, agar plates are a very basic technique. Even if you start your own yeast library with a different technique such as banking them in sterile solutions, slants or freeze them, agar plates still can be a useful tool to cultivate your yeasts. However, you can use the other methods and not use any agar plates as well.

At the end, let me write about contaminations. Have a look at Fig 2 again. This is how a pure, healthy yeast culture should look like on an agar plate. Now have a look at the following pictures:

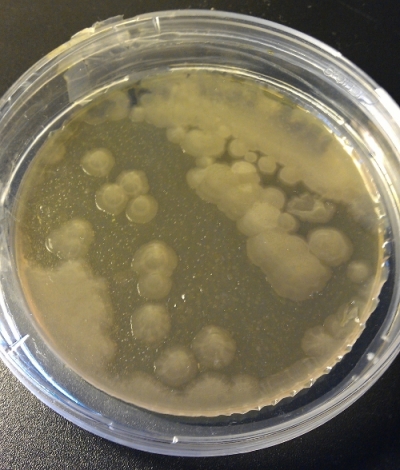
Fig 4: Contamination 1

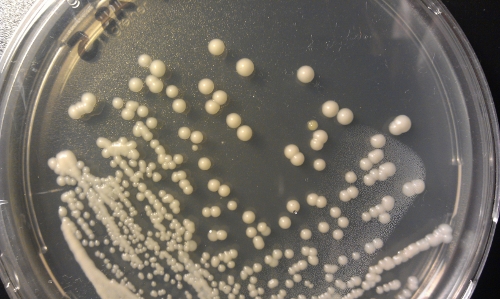
This is how a bacteria infection looks like (Fig 4). Can’t tell what kind of bacteria it was. But it was a bacteria (checked with microscope).

Fig 5: Contamination 2

The next one is quite tricky (Fig 5). There is one colony which looks different… Found it? Will solve the puzzle later on… I have no idea what this was. Haven’t checked it out.

Fig 6: Contamination 3

Next about molds: The white fluffy thing in the left upper corner (Fig 6).

Fig 7: Contamination 4

Another mold (Fig 7). I do have a lot of mold contaminations. Maybe 80% of the contaminations I have are molds…

Fig 8: Contamination 5

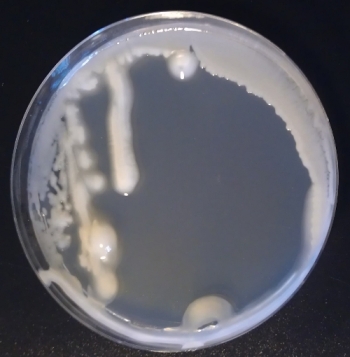
The last picture is no contamination. This is how a dry plate looks like (Fig 8). Chance is little to retrieve your yeast from such a plate… And the contamination colony in Fig 5 is the yellowish one on the right upper corner. Finding such odd-looking colonies can be hard. And if such contaminations appear you either get rid of the yeast or try to get rid of the contamination by re-streaking a colony on a new plate and hope for the best.

Unfortunately for me, Lactobacillus does not grow on Sabouraud agar. Lactobacillus is a very common beer spoilage bacteria. Another one is Acetobacter. If there is Lactobacillus in one of my yeast sample, I could not tell by just looking at the agar plate since no Lactobacillus colonies arise. Maybe someone out there has any experience with Lactobacillus on malt agar. I want to close this huge post with a thing to remember. Keep in mind, you just see the microorganisms capable of growing on the agar media. Any microorganisms not able to grow on the agar media will stay hidden… Stay tuned! The next post will be about banking yeast in sterile solutions.

Yeast banking – #1 Introduction

Eureka, today is the beginning of another post-series in the yeast basic area. The topic of this one is all about yeast banking at home (or in a lab). Today is all about the basics of yeast banking, what to consider and what methods there are. The next posts will be about the different methods. Lets begin.

What is yeast banking?

Yeast banking is a technique to store your yeast strains over a longer period of time to either reuse it later on or maintain a collection of strains. Storing freshly harvested yeast for a short time is yeast storage in my opinion and not the topic of these posts. Yeast banking is a long-time storage of your yeast to have them ready again in a year or maybe more. Another difference between yeast banking and storage is the amount of yeast. In yeast banking you only store a small amount of yeast.

Reasons to consider yeast banking?

Yeast banking can have different advantages such as lower prizes for your yeasts (use for multiple times or use them again in a year or more), having different strains available or even maintain yeast strains which are not commercially available. In addition, you can trade yeast strains with others. Let me add, if you brew only with dried yeasts, yeast banking is not a technique you should consider. It is not worth the money.

What are the basics of yeast banking?

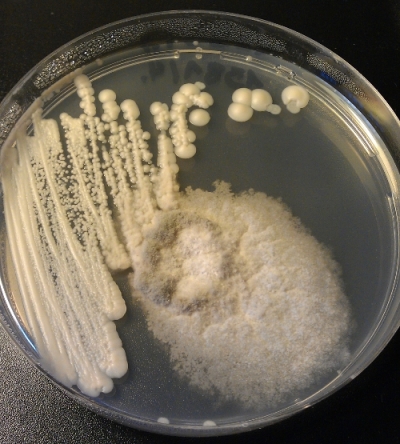
Fig 1: Banking with agar plates

The goal of yeast banking is to have the yeast in a state where it can survive for a long time. Dormant yeast cells are very suited for this job. First, the yeast cells have to be very vital before you bank them.

Viability and vitality. Viability describes the live/dead ratio of a yeast population. A very viable yeast sample has a high amount of live yeast cells and only a few dead ones. Typically, healthy yeast samples have viabilities greater than 95%. Meaning 95% of the yeast cells are viable, 5% aren’t. Vitality on the other hand describes the physiological state of a yeast cell. It more or less describes how fit the yeast cells are. Storing yeasts with a low viability will only cause troubles sooner or later. The first thing to consider in yeast banking is the cells viability, second the vitality.

To summarize, the yeast for the banking process should be very viable and vital. More about this later on.

The next thing to consider is the environment you put your yeast in for the storage. I call it media from now on. Any media which can stress the yeast cells is not suitable for the job. Factors causing stress are alcohol or the osmotic pressure for example. Storing yeast in distilled water will stress the yeast cells since the distilled water will lead to a swelling of the yeast cells (water flows into the yeast cells) and the yeast cells will probably burst. What are suitable media for your yeast cells? One way to go is use isotonic sodium chloride solutions. The sodium chloride prevents any osmotic pressure difference between the water surrounding the cell and the cell’s interior. So no swelling and bursting of the yeast cells. Further information about the media will follow in future posts about the different techniques.

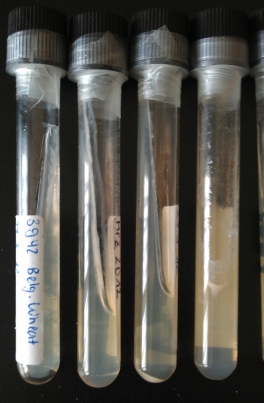
Fig 2: Yeast banking with liquids

Third, depending on the period of time you want to store your yeast, a different kind of technique has to be used. Therefore consider how long you want to keep your yeasts in general and how much maintenance work you want to put into your yeast banking system.

To summarize, important things to remember before heading into yeast banking are the vitality/viability of your yeast, the media you put your yeast into and the time frame you want to store the yeasts. For example, banking yeast which was in the refrigerator for four weeks is probably not the best source of yeast since the vitality/viability will have suffered over time for sure. Do a starter first to increase the vitality/viability.

Another important thing is sterility. You have to work very cleanly to avoid any contaminations in your yeasts. The yeast cells might have suffered a bit over the period of time and any contamination may have an easy game to overgrow the yeasts.

What are the different techniques for yeast banking?

Four different techniques come into my mind when I think about yeast banking. I am sure there are different ones as well but many of them are derivatives of the following four:

– Yeast banking with agar plates
– Yeast banking with agar slants
– Yeast banking with isotonic sodium chloride solutions (or in any other liquids)
– Frozen yeast banking

The next four posts in this series will be about one of these techniques each.

Why am I yeast banking?

I am yeast banking due to several reasons. First, to have different yeast strains available and save some money because I do not want to buy yeast for every single batch. Second and most importantly store my special yeasts. These are yeast I isolated from different bottles of beer and are not commercially available. In addition some seasonal yeasts releases from the private collection from Wyeast’s. And last because it is fun and you can do yeast trades.

Fig 3: Frozen yeast library

What is the best method for yeast banking?

I can already answer this question: There is none. Every method has its advantages and disadvantages. Only you can decide which method is best for you. However, I am really fond of the isotonic chloride solutions because I have a lot of good experience with this method. Some yeasts can survive up to two years in there without doing any maintenance work. Unfortunately, not every strain behaves the same. Some yeast strains will be dead sooner than others.

What method do I use?

As already mentioned, I use(d) the sterile liquids approach. I store(d) my yeasts in isotonic sodium chloride solutions and had no troubles so far. At the moment, I am switching to a frozen library because of the amount of strains I have. However, I keep the sodium chloride liquids until they are either gone or the yeasts are dead.

Are there any other sources to get information about yeast banking?

Sure, yeast banking is not my invention. These techniques are very common in the labs to store nearly any kind of microorganisms for later uses. Therefore a lot of different protocols exist about banking. Since we are in the homebrewers area here, the protocols should be rather easy to follow. Very often in labs the microorganisms are stored in -80°C (-112°F) fridges or even colder. I wonder if anyone of you has such a fridge at home… Therefore other techniques have to be used.

Fig 4: Banking with agar slants

A book I recommend is “Yeast: The Practical Guide to Beer Fermentation” by C. White and J. Zainasheff. Everyone of you out there interested in getting into yeast banking and such should buy a copy. I am not related to any of the authors so no personal benefit for me in there. The whole chapter six is dedicated to “Your Own Yeast Lab Made Easy”. An excellent source in my opinion.

Other sources can be found with your search engine of choice.

What will the next posts be about?

The next four posts will be about each of the four techniques mentioned above. I will try to explain the method how they work, the material you need and tell you some advantages and disadvantages. In addition, my experiences with the technique if I have some. Stay tuned!

#7 Zelebrator Weizenbock

Eureka, its time for another recipe from the past. Today’s recipe is a recipe for a wheat bock (Weizenbock in German). A wheat bock is basically a Dunkelweizen brewed to bock strength. For further information about the style please have a look at the BJCP style 15C Weizenbock. The following recipe is not a recipe for a traditional Weizenbock since bocks are traditionally made with a decoction mash. I went with an infusion mash instead.

Recipe: Zelebrator Weizenbock
Numbers: Volume [L] 15 (4.0 gal)
Original gravity 18.5°P
Terminal gravity 6.4°P
Color Around 23 EBC
IBU 5 IBU
ABV 7 %
Grains: Pilsner malt (4 EBC) 1kg
Wheat malt (4 EBC) 2 kg
Munich malt 1 (14.5 EBC) 1 kg
Carafa Typ 1 (900 EBC) 0.02 kg
Hops: Hersbrucker (3.6% AA) 14.2 g and boil for 70 min
Hersbrucker (3.6% AA) 14.2 g and boil for 1 min
Yeast: Saflager S04
Water: Burgdorf Mash: 12 L (3.2 gal), sparge: 9 L (2.4 gal) @78°C (172°F)
Rest: Mash in @45°C (113°F), 20 min @45°C (109°F), 30 min @61°C (142°F), 30 min @72°C (162°F), 10 min @ 78°C (172°F)
Boil: Total 70 min
Fermentation: Primary 4 days @ 20°C (68°F) in plastic fermenter
Secondary None
Maturation: Carbonation (CO2 vol) 2
Maturation time 3 weeks

01/20/07: Brewday number seven. All went according to plan. I had two kettles back then, one for mash (on the right side) and one for the hot water (left).

I even had a old-school stirrer made out of a windshield wiper motor. Unfortunately, the motor got hot very fast and stopped… Not a good qualification for a mash stirrer… Nevertheless, the mash went great and the iodine test was negative at the end. Then boiled the wort for 70 min with the addition of the hops and added the yeast after it reached the right pitching temperature.

01/24/07: Bottled the beer after four days already. The gravity was around 7°P and the forced fermentation test ended at 6.4°P. The remaining 0.6°P should be enough to carbonate the beer. I then left the bottles carbonate and mature for three weeks at cellar temperatures and stored them in my cellar until further use.

Unfortunately, I do not have any pictures of the finished beer and somehow lost my tasting notes. This is the last batch where I do not have any tasting notes. Although further batches will not have pictures of the beers… Sorry for that. I wasn’t planning on writing about the beers back then. Stay tuned for further recipes!

Yeast basics: Counting yeast cells

Eureka, this post starts the yeast basic series. Today, we are talking about a basic technique how you count yeast cells to determine the cell concentration in a yeast starter or calculate the amount of yeasts you have in total. This method is only for those of you having access to a microscope. However, there is another easier technique to get an idea about the yeast concentration. Will cover this technique in a future post. Lets begin with the microscope based technique.

Why count the yeast cells?

Counting cells is a technique to determine the cell concentration in a liquid. Imagine you want to make a 5 gal (18.9 L) batch of beer with an original gravity of 1.048 (12°). How much yeast do you need to get a healthy fermentation? This can be calculated by different yeast calculators such as the one from J. Zainasheff (mrmalty.com). The right amount of yeast would be 170E9 cells for this example. Lets assume you do not have the right amount of yeast available and you need to propagate the yeast with starter(s). You could even harvest yeast from a previous batch to ferment another batch. The question now arises, how can you be certain to have the exact number of yeast cells after the propagation step(s) or how much of the yeast cake do you need to harvest to get the right amount of yeast cells? This question can be answered with a cell count.

What do I need to count yeast cells?

First of all, you need a counting chamber. A Neubauer-improved counting chamber works very well for yeast cells. More about the counting chamber later on. Second, you need a microscope with a magnification greater than 400x. Third, equipment to dilute the yeast samples. Pipettes and graduated cylinders work very well.

What is a counting chamber?

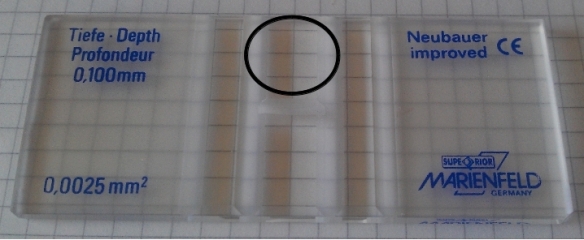
A counting chamber is a special glass slide (the size of a normal microscope slide) with engraved squares and a cover slip (not shown). The squares are located in the middle of the chamber (indicated with the circle in Fig 1).

Fig 1: Neubauer-improved counting chamber

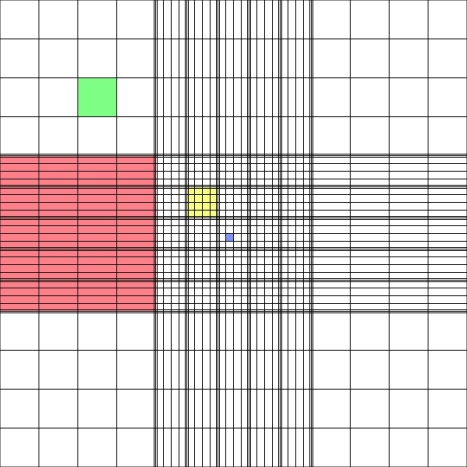
Fig 2: Haemocytometer grid [from Wikipedia]

Now about the squares of the counting device. There are nine big squares (red). In the red square are again 16 squares (green). There are yet smaller squares (yellow and blue ones). The counting chamber can be used for different cell sizes. If you have bigger cells such as leukocytes, you could count them in the red and green squares. In case of yeast cells, you can use the yellow squares because these cells are smaller than leukocytes.

When you prepare the chamber, you cover the squares with a cover slip. The gap between the squares and the cover slip is exactly 0.1 mm. The area of the red square equals 1 mm2, a yellow square equals 0.040 mm2 and therefore equals 4 nL (= 4 nano liters) of volume with the cover slip mounted on the counting chamber. The squares therefore represent a very small volume. Counting the cells in these squares can give you information about the cell concentration in the end.

How do you prepare and use the counting chamber?

Please consult White Labs homepage and have a look at the following video. Please notice the particles shown in the video are about 100 times bigger than yeast cells. For these particles the red squares are the most useful ones. For yeast cells on the other hand, use the yellow squares.

Two more things. First concerning the cover slip. In the video the cover slip is just laid on the counting chamber (synonym for hemacytometer). I breathe on the cover slip first and then lay it on the counting chamber. If you do it right you should see some Newton’s rings. If these rings can be observed the gap between the counting chamber and cover slip is tight.

Second concerning the counting rules. As mentioned there are several accepted ways to do so. I learned to count the cells touching the tripled line on top and the right side. Cells touching the lines on the bottom and the left side are not counted. More about that later on. So far about the principles.

Lets make an example

You made a starter (1’000 mL) and want to know how many yeast cells you have in there and check if you have enough yeast cells to ferment your batch.

1. You first dilute 1 mL of the yeast starter with 99 mL water or isotonic sodium chloride solution (9 g sodium chloride dissolved in 1 L of water). This is a 1:100 dilution step. If you expect a low yeast concentration, a 1:10 dilution could work as well or even load the chamber with undiluted starter.

2. You then load the chamber and it looks like the following picture:

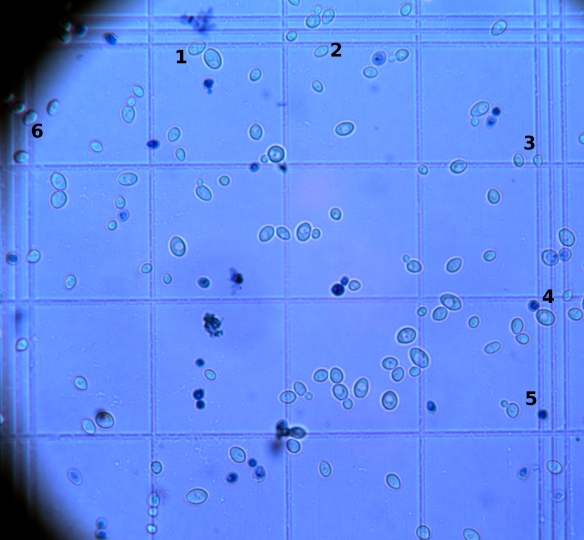
Fig 3: Yeast cells in counting chamber

What you can see here are mostly yeast cells. Don’t bother about the blue color. This is how your yeast sample in the counting chamber could look like. Now, please notice the triple lines on the left side, top and right side of the picture. The bottom one is not visible in the picture. But there are some of these lines at the bottom as well. If you compare it with the lines in Fig 2, you can see that you are looking at a yellow square with the 4 x 4 blue squares. The triple lines are the border lines of the yellow squares. Next thing to do is count all the cells in the yellow square (between the triple lines). Please have a look at the video mentioned above how you count the cells. As mentioned above, there are several rules about how to count the cells. My technique is to count only the cells touching the lines on top and the right side. Lets have a look at the picture above. In the second square on the top left, there is a cell touching the tripled line (marked as 1). This cell is included in the count. The cell marked as 2 and 3 are included as well. The two cells in proximity of 4 are included as well. The cell below the 4 is still in the square. The cells above the 4 are not included since they are not in the square. Next dark blue cell 5. If you look at the cell it is just at the border. I guess here you can decide whether you include the cell or not. And to finish, cell number 6 is not included since it touches the lines on the left side. I hope this helped to understand how to count the cells.

Lets say you counted a total of 65 cells. Next you count another four of these squares. In total five yellow squares. Lets say you counted 60, 70, 62 and 55 in the next yellow squares.

3. Add all the numbers together: 65+60+70+62+55 = 312 cells. You therefore have 312 cells in 20 nL (since one yellow square equals 4 nL and you counted five in total).

4. Multiply 312 by 5 to get the concentration in 100 nL. In this case you have 1560 cells in 100 nL. Or 15600 cells in 1 µL.

5. Then multiply the 1560 cells with 10000 to get the concentration per mL (conversion from 100 nL to mL). In this case 1.56E7 cells in 1 mL.

6. Last thing to do is to include the dilution of 1:100 from the beginning. Multiply the 1.56E7 cells per mL with 100 to get the final yeast concentration of 1.56E9 cells per mL. This is the yeast concentration you have in your 1000 mL starter. In total, you now have 1.56E12 yeast cells in the yeast starter (1.56E9 cells per mL x 1000 mL = 1.56E12).

Coming back to the 5 gal (18.9 L) batch of beer with an original gravity of 1.048 (12°). We previously calculated that you need 170E9 yeast cells for this batch. Your starter has a cell concentration of 1.56E9 cells per mL. 170E9 cells divided by 1.56E9 cells per mL gives you a volume of approximately 109 mL. You therefore need to pitch 109 mL of the yeast starter to have the right amount of yeast cells. In fact, your yeast starter would have enough yeast cells to ferment approximately 170 L (45 gal) of a 1.048 (12°P) wort.

To summarize, the best way to get an idea about the yeast concentration of a starter or a yeast slurry is to use a counting chamber and count five yellow squares. Add all the numbers together and multiply it by 50000 to get to the concentration in cells per mL. And don’t forget the dilution factor. Simple as that.

In my opinion, if you count yeast from a starter of a fresh yeast slurry, you do not have to worry about the yeast health. Just count the yeast cells and get an idea about the yeast concentration. On the other hand, if you count yeasts which are not the healthiest anymore, it seems advisable to determine the viability of the yeast as well. This means, get an idea about how many yeast cells are dead. More about the viability test in a future post. Stay tuned for future posts and please let me know if something is not clear.