Tasting: #35 Rusalka Imperial Stout

Eureka, it’s time for another tasting post. I would like to share some tasting notes of #35 Rusalka Imperial Stout brewed in May 2011. Bottled on the 18th of June 2011. We tried this beer from time to time to see how the profile changes.

RusalkaOfficial tasting number 1, (08/30/2011), two months in bottle

Aroma: Wood character, lots of coffee and roast character. Some alcohol detectable as well.

Appearance: Black, brown creamy head, nice lacing

Flavor: Lots of roast character again, coffee character, warming alcohol detectable

Mouthfeel: Medium body, low carbonation level, light sweet and warming aftertaste, light astringent finish as well

Overall Impression: Not bad, however a lot of rough edges and alcohol shines through. Further maturation needed

Official tasting number 2, (02/27/2012), eight months in bottle

Aroma: Chocolate, smoke, hints of raisins, light sweetness, licorice. No alcohol detectable.

Appearance: Black, 1 finger brown head, frothy and creamy head, lots of lacing

Flavor: Smoke, chocolate, heavily roasted coffee

Mouthfeel: Light – medium body, average carbonation level, light bitter and roast driven finish. Not astringent anymore. Kind of watery… (not the body one would expect from such a beer)

Overall Impression: Improved a lot compared to the first tasting. However, it gets obvious that this beer lacks in-depth. Meaning, the body of this beer is a bit too low to counterbalance the flavors. To change that, either increase the alcohol level and/or add further unfermentable sugars to make it rounder. This was the official tasting before entering this beer in a homebrewer’s contest. Well, we can’t be too upset about this beer since it won us the first prize in the Dry Stout category (there was no other more suitable category to enter this beer).

Official tasting number 3, (01/06/2013), 19 months in bottle

Aroma: Lots of dark chocolate, roast character, coffee, reminds me of milk chocolate. Some alcohol detectable

Appearance: Dark black, creamy head, nice lacing

Flavor: Dark chocolate, roasty character, sticky and decent level of bitterness still

Mouthfeel: Medium body, average carbonation level, chocolate finish

Overall Impression: Pretty neat! In my opinion, the body of this beer is now spot on. I have no idea how/why this is the case after further maturation.

I can’t complain about this beer at all. First, it was my very first Imperial Stout (however a bit short for an Imperial Stout) and second, it won us a competition (first as well). A very neat base for further improvements which are already going on. The second batch was brewed in September 2013 (#66 Rusalka II Imperial Stout) with some minor changes such as increasing the original gravity a bit to get to an ABV of roughly 8% to be at the lower end of the Imperial Stout category style description. And we matured the second batch on some Whisky soaked wood. A third batch will follow in Fall 2013. Future changes of the original recipe will include changes to increase the body of the beer as well as hiding the alcohol.

This batch gave us a lot of great experiences brewing higher ABV beers and getting an idea how such a beer changes over time. We are now able to brew big beers up to ABV levels of 12%. The next big Imperial Stouts in our pipeline should get past an ABV level of 15% (Without any sugar additions!) Cheers!

#19P Heidelberger Kellerbier Clone

Eureka, yet another recipe from the old days (2010). There is one recipe left to publish and afterwards all my recipes up to batch number 50 will be on this blog. The recipe below is basically a recipe clone to re-create a Kellerbier (link to ratebeer) I tasted during a study trip to Heidelberg, Germany. Originally brewed by the Kulturbrauerei Heidelberg. We even visited the brewery for a tour which was quite interesting as well. Was quite a nice study trip. Our goal was to find the best beer in Heidelberg… In the end, the group decided Heidelberger Export (link to ratebeer) to be the best. Anyway… Lets get back to the Kellerbier. I really enjoyed this beer, bought myself a bottle and isolated the yeast from it. And this recipe was the first (and last) attempt to brew a Kellerbier clone using the isolated yeast.

Recipe: Heidelberger Kellerbier Clone
Numbers: Volume [L] 5 (1.3 gal)
Original gravity 13.5°P (1.054)
Terminal gravity 4°P (1.016)
Color Around 20 EBC
IBU 19 IBU
ABV 5.2% (v/v)
Grains: Munich malt (14.5 EBC) 0.65 kg
Caramunich II (120 EBC) 0.075 kg
Acidified malt (5 EBC) 0.025 kg
Vienna (8 EBC) 0.3 kg
Hops: Hallertauer Tradition (4% AA) 8.2 g and boil for 90 min
Saazer (5% AA) 5 g and boil for 1 min
Yeast: Wyeast’s Yeast isolated from
Heidelberger Kulturbrauerei
Water: Burgdorf Mash: 4 L (1.1 gal), sparge: 5 L (1.3 gal) @78°C (172°F)
Rest: Mash in @55°C (131°F),
15 min @55°C (131°F),
35 min @64°C (147°F),
20 min @72°C (162°F),
20 min @ 78°C (172°F)
Boil: Total 90 min
Fermentation: Primary 14 days @8°C (46°F) in plastic fermenter
Secondary N/A
Maturation: Carbonation (CO2 vol) 3 with sugar addition
Maturation time > 3 weeks

August 2010: (Don’t know the exact date anymore). Small batch brew day. Crushed all the grains, mashed in at 35°C (95°F) and increased the temperature to 55°C (131°F) and followed the mash schedule as mentioned in the recipe above. Then sparged at 78°C (172°F) and boiled the wort with the mentioned hops. Cooled down to 20°C (68°F) and stored the fermenter (no yeast added yet) in my refrigerator at 8°C (46°F) over night. I then added the yeast in the morning, aerated by shaking and left the fermentation go for 14 days. Gravity was down to 4°P. Left the fermenter sit at room temperature for two days (diacetyl rest). Then bottled with an addition of sugar.

Tasting: (beer nearly 2 months in the bottles):

Aroma: Very malty. Nothing else.

Appearance: Brilliant clear, amber color, white head with very small bubbles.

Flavor: Malty, caramel, sweet, not bitter and slightly dry nevertheless

Mouthfeel: Light to medium body, average carbonation level, finishes with a malty medium lasting aftertaste.

Overall Impression: Unfortunately, I could not compare this batch with the original brew since I had to drink the only bottle I got to get to the yeast sediment. However, this is a very neat malt-caramel driven beer like one would expect from a Kellerbier.

I lost the isolated yeast strain in the meantime and this is why I can’t brew another batch. Honestly, I am not sure if I would have brewed a second batch anyway. Anyway, it turned out great, was fun to brew and cool to use an isolated yeast as a primary strain. Cheers!

#25P Decoction Wheat

Eureka, yet another post about a recipe from the old days. April 2011 in this case. This time about my first decoction batch I conducted. Decoction is basically a technique where one heats up only a small part of the mash in a separate kettle and pours it back to the main mash to raise the temperature. Therefore a different technique to raise the temperature of your mash instead of direct heat. Decoction mashes are very common in wheat breweries and some say that it has a major impact on the flavor of a beer.

I did a decoction mash on a small-scale to test how it works. The recipe is straight forward with some acidified malt to adjust the mash pH at the beginning.

Recipe: Decoction Wheat
Numbers: Volume [L] 5 (1.3 gal)
Original gravity 13.5°P (1.054)
Terminal gravity 5°P (1.020)
Color Around 4 EBC
IBU 13 IBU
ABV 4.7% (v/v)
Grains: Pilsner malt (4 EBC) 0.52 kg
Wheat malt (4 EBC) 0.65 kg
Acidified malt (9 EBC) 0.025 kg
Hops: Hallertauer (8% AA) 3.3 g and boil for 90 min
Yeast: Wyeast’s #3068 Weihenstephan
Water: Burgdorf Mash: 4 L (1.1 gal), sparge: 5 L (1.3 gal) @78°C (172°F)
Rest: Mash in @40°C (104°F),
25 min @50°C (122°F),
20 min @64°C (147°F),
60 min @71°C (160°F),
10 min @ 78°C (172°F)
Boil: Total 90 min
Fermentation: Primary 14 days @18°C (64°F) in plastic fermenter
Secondary N/A
Maturation: Carbonation (CO2 vol) 3.5 with sugar addition
Maturation time > 3 weeks

04/16/2011: Another pilot batch brew day. Crushed all the grains and mashed in at 40°C (104°F) and then let the temperature rise to 50°C (122°F) by directly heating the mash. After the 25 min rest, I removed 50% of the mash and heated this share up to 71°C (160°F), then let this share rest for 15 min and heated up to a boil and boiled for 20 min. Afterwards, the boiled share was poured back to the main mash to increase the mash temperature from 50°C to 64°C (147°F). After a 20 min rest I increased the temperature again by direct heat up to 71°C (160°F), rested for 60 min and then prepared for the mash out at 78°C (172°F). Sparged with 5 L of 78°C (172°F) water and collected the runnings. Then boiled the wort with the small Hallertauer hops addition for 90 min, cooled the wort down to 20°C (68°F) and added freshly propagated #3068 Weihenstephan yeast.

05/01/2011: Bottled the beer after a primary fermentation step of roughly 14 days and added enough sugar to get a carbon dioxide level of 3.5 vol. Then stored the bottles at room temperature for another seven days and then stored the bottles in my refrigerator.

Tasting:

Aroma: Slight banana aroma, grainy and a bit of sulphur detectable.

Appearance: Yellow-gold, white creamy head, nice carbonation level. Poured the yeast sediment into the glass as well.

Flavor: Rather subtle banana character, hint of grains…

Mouthfeel: Light to medium body, lively carbonation level, short light grainy aftertaste. Easy to drink.

Overall Impression: This is a wheat beer but without any special character I expected from the decoction mashing like some caramel or even some burnt character. In my opinion, the decoction mash did not contribute to additional flavors or aroma I could taste. Either the technique was not right or I simply can’t taste the differences.

I haven’t done any decoction mash since simply because I do not brew any wheat beers anymore (brewed enough of it). However, all future batches of Lambics will be brewed using the traditional turbid mash technique which is kind of a decoction mash technique as well. In this case, my Lambics improved a lot since I switched from traditional infusion mashes to the turbid mash. And I can clearly taste the difference there. Cheers!

Tasting: #36 Vanilla Infused Rusalka Imperial Stout

Eureka, it has been a while since I posted any tasting notes. I would like to reveal the tasting notes of batch #36 Vanilla Infused Rusalka Imperial Stout today. This is a batch brewed in 2011 and bottled in mid June in 2011. It finished with an ABV greater than 12%, fermented with Safbrew S33 and infused with two vanilla beans and some raisins. By the way, we previously used some of this batch for our beer-based candy syrup which turned out really well.

IMG_42452(Actually, the beer shown in the glass above is not this batch of Rusalka rather than the first batch of #35 Rusalka). However, all our Imperial Stouts look very similar (black).

The beer matured for 1 year and 8 months. I store all these high ABV beer in a cellar at around 12°C (54°F).

Aroma: The first thing we notice is: umami. This is hard to explain but this beer’s aroma is somewhat between salty and spicy. This umami taste is not off-putting in any means. I would not call it an off-flavor. Maybe the umami comes from yeast autolysis? Some pepper notes as well, chocolate, slight coffee character. Bit of vanilla. No fruitiness. No alcohol detectable as well.

Appearance: Black, decent tan head, nice bubbles rise to the top, nice lacing as well, clear with a nice yeast sediment in the bottle.

Flavor: Milk chocolate bomb, some roast and coffee character with a decent bitterness level. Some molasses as well. In one word: milk-chocolate-infused-cold-coffee.

Mouthfeel: Medium to full body, low carbonation level (bottled to a carbon dioxide level of 2 vol), long-lasting dark chocolate finish. With nice bitterness in the aftertaste. Warming sensation from the alcohol. However not burning.

Overall Impression: This is a really nice beer. The typical Imperial Stout character is definitely there. However, the vanilla and raisins are really in the background. We could not detect any raisin character. I would suspect those flavors to decline over time anyway and maybe we sampled the beer at a point where those flavors were below our tasting threshold. What I like most about this brew is that the alcohol is well hidden. There is no boozy aroma nor a burning aftertaste. The aroma is really nice as well. We tried this brew from time to time and it improved a lot during further maturation. All the aroma and flavor components really mellowed out, the bitterness level decreased significantly and the astringent character from the roasted malt disappeared as well.

What would I change recipe-wise for a future batch? The base of this beer is quite solid in my opinion. If one wants to get a stronger vanilla and raisin character, one should consider maturing this beer in a keg first and add vanilla and raisins just a few weeks before taking the first sip. Key components in making this beer are for sure a long maturation time to give the beer enough time to mellow out. Cheers!

Saccharomyces bromocresol green screen

Eureka, I would like to share my latest plating results with you. You might know that I am very interested in isolating any kind of wild yeasts from commercial sour beers. The most difficult task in this whole isolation process is to differentiate normal Saccharomyces cerevisiae colonies from other yeast species such as Brettanomyces.

Previous studies to develop new kind of agar media to detect Brettanomyces in wine samples showed bromocresol green to be a useful indicator to detect acid producing Brettanomyces strains [Rodrigues et al., 2001; Couto et al., 2005, EP 1185686 A1]. In this case, bromocresol green acts as a pH-indicator and turns yellow in the presence of acid which is produced by some Brettanomyces species. The authors further added cycloheximide to the media to prevent any growth of Saccharomyces. Concluding from the previously cited publications an addition of cycloheximide to agar media should already be enough to differentiate between Saccharomyces and Brettanomyces colonies by simply inhibiting the growth of Saccharomyces. Further antibiotics could be added to prevent the growth of bacteria.

Other studies showed that bromocresol green alone can be used to differentiate between the two yeasts in absence of antibiotics [Yakobson, 2010]. In addition, bromocresol can diffuse into yeast colonies and form green colonies due to the accumulation of the dye [Yakobson, 2010]. However, some Brettanomyces strains seem to be able to form white colonies again. This has been shown in other experiments as well [Rodriguez, 2012; BKYeast, 2012]. Yakobson mentions that the dye gets actively metabolized by Brettanomyces and hence the white colonies again. Unfortunately, I could not find any source investigating how exactly the dye get metabolized. Yakobson further mentions that some Saccharomyces strains can form white colonies as well which would make it even more difficult to differentiate between Saccharomyces and Brettanomyces.

The aim of this study was to screen different Saccharomyces strains for their ability to form white colonies on bromocresol green containing agar.

Material

  • Sabouraud agar 4% glucose, Art. X932.1, Roth
  • Bromocresol green sodium salt, Art. KK18.1, Roth
  • Saccharomyces strains from Wyeast and White Labs

19 different Saccharomyces strains including one Saccharomyces mixture (WY3056) were plated on Sabouraud agar containing bromocresol green. Bromocresol green was added as aqueous, sterilized solution to the sterilized Sabouraud agar until the agar turned blue. The plates were incubated at room temperature at a dark place until colonies were visible. A control was included (no yeast streaked) to observe any color changes of the agar due to environmental effects (photo bleaching, oxidation, decay etc). The following yeast strains were used for this screen.

Number Product name
WY1010 American Wheat
WY1056 American Ale
WY1084 Irish Ale
WY1728 Scottish Ale
WY1762 Belgian Abbey II
WY2112 California Lager
WY2278 Czech Lager
WY2487 Helle Bock
WY3056 Bavarian Wheat Blend
WY3068 Weihenstephan
WY3333 German Wheat
WY3522 Belgian Ardennes
WY3638 Bavarian Wheat
WY3711 French Saison
WY3726 Farmhouse Ale
WY3864 Canadian/Belgian Ale
WY3942 Belgian Wheat
WY3944 Belgian Wit
WLP002 English Ale
Control N/A

Results Part 1

Colonies were visible after four days of incubation (Fig 1-5). The control showed no colony formation and the agar showed no color change. The colors of the agar were compared with the control.

plate1

Fig 1: Yeasts on bromocresol agar after four days. Left: WY1762, Top: WY3522, Right: WY3864; Bottom: Control

plate2

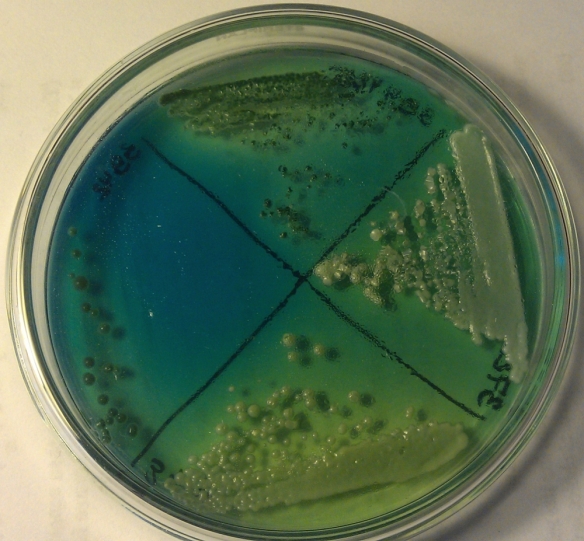
Fig 2: Yeasts on bromocresol agar after four days. Left: WY3942, Top: WY3944, Right: WY3726; Bottom: WY3711

plate3

Fig 3: Yeasts on bromocresol agar after four days. Left: WY2487, Top: WY2112, Right: WY2278; Bottom: WY1010

plate4

Fig 4: Yeasts on bromocresol agar after four days. Left: WY3638, Top: WY3068, Right: WY3333; Bottom: WY3056

plate5

Fig 5: Yeasts on bromocresol agar after four days. Left: WLP002, Top: WY1056, Right: WY1728; Bottom: WY1084

Some Saccharomyces strains were able to change the color of the agar from green-blue to yellow. Only two yeast strains, WY3333 German Wheat and WY3726 Farmhouse Ale, grew as white colonies on bromocresol green agar after four days. This already is proof that some strains indeed can grow as white colonies on bromocresol green. The plates were further incubated and after a total of twelve days, the color of the colonies were evaluated for a second time (Fig 6-10). Sorry for the bad quality of the pictures.

plate1

Fig 6: Yeasts on bromocresol agar after 12 days. Left: WY1762, Bottom: WY3522, Right: WY3864; Top: Control

plate2

Fig 7: Yeasts on bromocresol agar after 12 days. Left: WY3942, Top: WY3944, Right: WY3726; Bottom: WY3711

plate3

Fig 8: Yeasts on bromocresol agar after 12 days. Left: WY2487, Top: WY2112, Right: WY2278; Bottom: WY1010

plate4

Fig 9: Yeasts on bromocresol agar after 12 days. Left: WY3638, Top: WY3068, Right: WY3333; Bottom: WY3056

plate5

Fig 10: Yeasts on bromocresol agar after 12 days. Left: WLP002, Top: WY1056, Right: WY1728; Bottom: WY1084

One could observe that some of the colonies now have white edges and a green centre. All these colonies were still counted as green colonies.

This time less yeast strains turned the agar to a yellow color because the control agar lost a lot of its blue color. The global decrease of the blue color in the agar might originate from diffusion of acids secreted by yeasts that turned the agar yellow. Or due to the diffusion of the dye into the colonies. Further on to the white yeast colonies. WY3333 German Wheat and WY3726 Farmhouse Ale still grew in white colonies. In addition, WY3864 Canadian/Belgian Ale and WLP002 English Ale now grew as white colonies as well. One might expect further yeast strains to form white colonies with a prolonged incubation time because a lot of the colonies already have white edges and a remaining green centre.

After 17 days of incubation, the colonies looked as shown below (Fig 11).

y2

Fig 11: Yeasts on bromocresol agar after 17 days. Left/bottom: WY2487, Left/Top: WY2112, Right/Top: WY2278; Right/Bottom: WY1010

A lot of yeast colonies now turned into white colonies as expected (Fig 12). The color was now evaluated by looking at the entire colonies visible for a particular strain. If more than 50% of the colonies were white, the yeast was counted as white. Like the WY2278 Czech Lager shown in Fig 11. On the other hand, all the other yeasts shown in Fig 11 were counted as green like the WY3711 French Saison in Fig 12.

y1

Fig 12:WY3711 French Saison colonies after 17 days of incubation

After 17 days of incubation, only seven out of the 19 screened yeasts still had green colonies. All the other ones turned white in the meantime. To put it in numbers. After 4 days 2/19, after 12 days 4/19 and after 17 days of incubation 12/19 yeast strains formed white colonies (Fig 13). This clearly shows a time dependency.

screen1

Fig 13: Yeast screen results on heavily stained bromocresol green agar

Results Part 2

The blue color in the agar plates (Fig 1-5) was quite heavy and to test whether a lower concentration of bromocresol green in the agar leads to the same results as discussed above, a second experiment was conducting by streaking the exact same yeast strains on some Sabouraud agar containing bromocresol green. This time a lower concentration of bromocresol green was used.

Quantification of the color after three days of incubation (Fig 14-18):

y4

Fig 14: Yeasts on bromocresol agar after three days. Left: WY3864, Top: Control, Right: WY1762; Bottom: WY3522

y5

Fig 15: Yeasts on bromocresol agar after three days. Left: WY3942, Top: WY3944, Right: WY3726; Bottom: WY3711

y6

Fig 16: Yeasts on bromocresol agar after three days. Left: WY2112, Top: WY2278, Right: WY1010; Bottom: WY2487

y7

Fig 17: Yeasts on bromocresol agar after three days. Left: WY3638, Top: WY3068, Right: WY3333; Bottom: WY3056

y8

Fig 18: Yeasts on bromocresol agar after three days. Left: WLP002, Top: WY1056, Right: WY1728; Bottom: WY1084

Yet again some colonies grew as white colonies and others grew as green ones (Fig 19). Comparing the results with the one concluded from the first experiment, WY3726 Farmhouse Ale, WLP002 English and WY3864 Canadian/Belgian Ale showed white colonies. In contradiction with the first experiment are the color morphologies of WY3333 German Wheat, WY1728 Scottish Ale and WY3711 French Saison. WY3333 grew as white colonies in the first experiment and as green ones in the second one. On the other hand, WY3711 and WY1728 grew as white colonies in the second experiment.

y9

Fig 19: Closer look at Fig 15

The colours were again determined after further incubation. Agar plates shown after 12 days of incubation (Fig 20-24).

121

Fig 20: Yeasts on bromocresol agar after 12 days. Left: WY3864, Top: Control, Right: WY1762; Bottom: WY3522

122

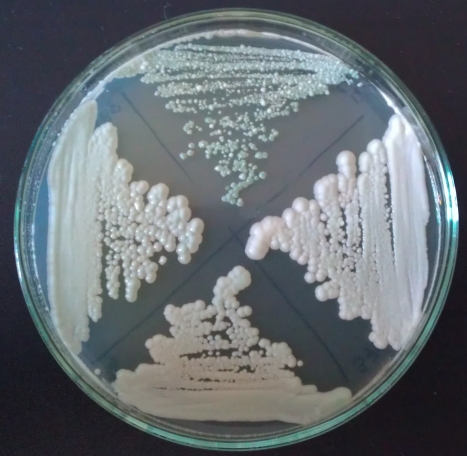
Fig 21: Yeasts on bromocresol agar after 12 days. Left: WY3942, Top: WY3944, Right: WY3726; Bottom: WY3711

123

Fig 22: Yeasts on bromocresol agar after 12 days. Left: WY2112, Top: WY2278, Right: WY1010; Bottom: WY2487

124

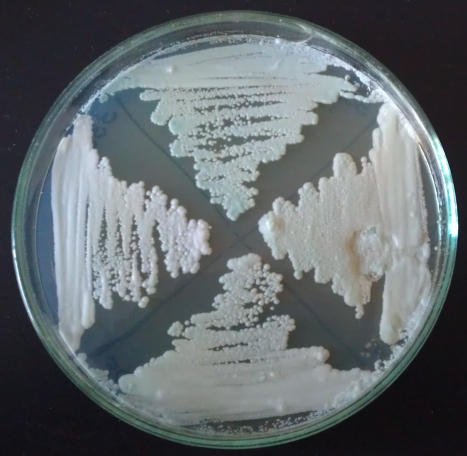
Fig 23: Yeasts on bromocresol agar after 12 days. Left: WY3638, Top: WY3068, Right: WY3333; Bottom: WY3056

125

Fig 24: Yeasts on bromocresol agar after 12 days. Left: WLP002, Top: WY1056, Right: WY1728; Bottom: WY1084

Twelve days of incubation and all the yeast strains have the same color like a few days ago. The plates were further incubated and a final color determination was conducted after 17 days (not shown).

The results of the second run are summarized in Fig 25. WY1010 American Wheat, WY1084 Irish Ale, WY1762 Belgian Abbey II, WY2112 California Lager, WY2278 Czech Lager, WY3068 Weihenstephan and WY3942 Belgian Wheat all had white colonies after 17 days (Fig 25). 13/19 yeast strains grew as white colonies after 17 days of incubation (Fig 25).

screen2

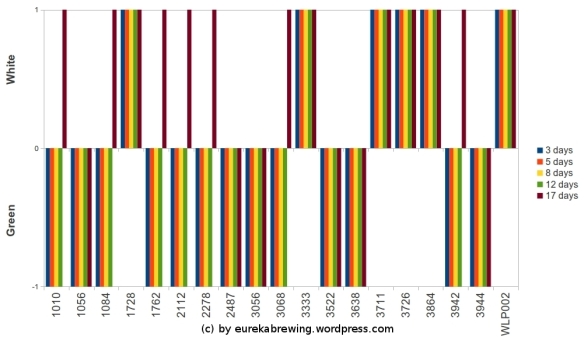
Fig 25: Yeast screen results on light-stained bromocresol green agar

Discussion

Comparing the two experiments, some strains such as WY1010 American Wheat, WY1728 Scottish Ale, WY2112 California Lager, WY3711 French Saison and WY3942 Belgian Wheat only grew in white colonies after 17 days on the light stained agar media and not the heavy stained one (Fig 26). WY3056 Bavarian Wheat Blend, WY3522 Belgian Ardennes and WY3638 Bavarian Wheat grew as white colonies on heavily stained agar but as green ones on lightly stained agar media (Fig 26). This might be an indicator that the bromocresol green concentration might influence the color change as well.

combined

Fig 26: Differences between the two experiments

As a general trend, the different yeast strains seem to form white colonies after further incubation. However, two strains (WY3333 German Wheat and WY3726 Farmhouse Ale) grew on heavily stained agar as white colonies from very early on (Fig 13) and four additional ones on lightly stained agar (Fig 25). Yakobson states on his website that Wit yeasts can metabolize bromocresol green (http://www.brettanomycesproject.com/2009/03/wln-agar-medium/). In this screen the Wit strain from Wyeast (WY3944) did not grew as white colonies in both experiments (Fig 13, 25). Not even after 17 days of incubation.

Some words about the color of the agar media. Fig 1 to 5 are nice examples to show that the color of the bromocresol containing media changes its color from green to yellow. In both experiments, the color of the control agar turned to a yellow color as well. The plates were stored at a dark place to prevent any influence of light (photobleaching effects). The change in color might be due to secretion of acids (bromocresol changes color at lower pH to yellow), due to a take-up of the dye by the yeast cells like stated by Yakobson in case of Brettanomyces. Another possibility might be the stability of bromocresol green itself. If one imagines bromocresol green to be a relatively unstable molecule, the loss of the green color might be due to the depletion of the dye. Yakobson further mentions that Brettanomyces can even metabolize the dye and therefore grow as white colonies. All the cells not able to metabolize the dye remain as green colonies. Unfortunately, I could not find any evidence for this statement showing that Brettanomyces really metabolize the dye. Nor any evidence that Saccharomyces can do it. Maybe the cytoplasm of Brettanomyces cells have a lower pH and therefore turn the dye from green to yellow. There might even be some truth about this hypothesis since some Brettanomyces strains are known to secrete acetic acid under aerobic conditions. It is therefore not clear to me why/how the colonies turn from green to yellow.

I would like to discuss bromocresol green as a useful tool to differentiate between Brettanomyces and Saccharomyces. Although I did not show any Brettanomyces colonies here, the bromocresol screen strongly suggests that some Saccharomyces strains can grow as white colonies on bromocresol green containing agar media. This makes a differentiation already a bit harder. In addition, a majority of Saccharomyces yeast strains appear as white colonies after a longer incubation period. BKYeast came to the conclusion that differentiation based on bromocresol green might only be possible in a short time frame in mixed cultures (Saccharomyces and Brettanomyces grow on the same plate). The results from these experiments show that even in pure cultures, and in absence of Brettanomyces, a lot of the Saccharomyces strains tested turned from green to white within a short period of time. All these results strongly suggest that any differentiation solely based on bromocresol green might only be useful in a short period of time.

Summary

Bromocresol screen is a widely used differentiating dye to differentiate between Saccharomyces and Brettanomyces. Brettanomyces known for their capability to grow as white colonies while Saccharomyces grow as white ones. It has been reported that some Saccharomyces strains grow as white colonies as well and therefore making a differentiation more difficult [Yakobson, 2010]. Screening different Saccharomyces cerevisiae strains on bromocresol green containing Sabouraud agar revealed some strains capable of growing as white colonies from the very beginning where the majority of yeast strains grew as green ones. Therefore showing that indeed some yeast strains can grow as white colonies. After further incubation, the majority of the yeast strains turned from green to white coloured colonies. There seems to be a general trend for Saccharomyces cerevisiae strains to form white colonies after extended incubation times. However the reason for this observation is not clear at this point as well as the mechanism leading to the observed change in color. It can’t be excluded that different sources like instability of bromocresol green itself or any environmental factor lets the colonies turn from green to yellow.

Due to these observations, bromocresol green as a tool to differentiate between Brettanomyces (known to grow as white colonies) and Saccharomyces might only work within a small time frame. This has been previously observed by BKYeast as well.

Outlook

Brettanomyces bromocresol green screen similar to the one shown here for Saccharomyces. In addition, try to grow Brettanomyces anaerobically to test whether the colonies grow as white or green ones (acid theory mentioned in the discussion).

References:

I am open to any discussions and feedback concerning this experiment. Thank you for reading.

Beer Candy Syrup Experiment

Eureka, today’s post is all about a recent candy syrup experiment. Making my own candy syrup was very tempting but I never got to actually do it. This all changed a few days ago when we decided to put the ingredients together for a long-planned batch of Belgian Dubbel. I used Brewferm’s Candy syrup (180 – 220 EBC) before and was quite pleased what this syrup contributes to a beer. In my opinion, the most important factor why Westlveteren 12, Rochefort 10 and all the other great Belgian Quadrupel beers are so amazing is because of the candy syrup they use. Candy syrup can contribute a lot of the dark fruit character, pear aroma, toffee and caramel one can taste in Quadrupels. And we wanted to have some of this character in our next Dubbel. However, our supplier was out of the Brewferm Candy Syrup and this gave us the opportunity to make our own candy syrup.

I don’t want to go into the chemical details here since I haven’t put much thoughts into that. To make candy syrup one needs sugar, a liquid and a nitrogen source for the Maillard reactions. Yeast nutrients are a very common to supply the needed nitrogen. We made three batches of candy syrup: One with plain table sugar, one batch with raw cane sugar and one batch with plain table sugar again but with beer instead of water. The process however was the same for all three batches and is explained in more detail in pictures below. All the recipes are based on J. Smiths Belgian Candy Sugar experiment aired by Basic Brewing Radio on May, 7th 2009. Every batch started with 0.45 kg of sugar (1 lbs), 0.5 cup of liquid and 1.5 table spoons of yeast nutrients. We added the sugar and yeast nutrients to the cooking pot first and afterwards the liquid. Not stirred at all. The temperature was then slowly raised to approximately 143°C (290°F). Again not stirred once during the whole process.

Syrup1

Fig 1: Table sugar based candy syrup at 75°C (167°F)

At 75°C (167°F) the first bubbles could be observed (Fig 1). At 85°C (185°F) a very distinctive ammonia smell escaped the pot.

Syrup2

Fig 2: Table sugar based candy syrup (20 min)

20 min after the first bubbles arose, the color of the candy syrup slowly turned darker (Fig 2). The temperature was around 127°C (260°F).

Syrup3

Fig 3: Table sugar based candy syrup

The color now got darker really fast as the temperature got closer to 143°C (290°F) (Fig 3). As the temperature reached 143°C (290°F), we added roughly 0.8 cup of water. Even for the share made with beer. This worked well for the table sugar based syrup but the raw sugar and beer based syrup foamed a lot. The addition of the water has to be done really carefully! One can easily get burned.

Syrup5

Fig 4: Table sugar based candy syrup after a second water addition

The temperature was then raised to 116°C (240°F) again (Fig 4) and the hot syrup was then transferred into glass jars (Fig 5).

Syrup7

Fig 5: First batch of candy syrup in glass jars

This is the basic process how we did our candy syrup. The second batch was the same as the first one but we used raw cane sugar instead of white table sugar. Just to see if there is a difference between different sugar sources. During the first batch we decided to use beer instead of water. Again just for fun and to see how it turns out. Beer should have extra nitrogen and maybe increase the flavors of the candy syrup as well.

Syrup6

Fig 6: Beer based candy syrup

We decided to use a heavy #36 Rusalka Russian Imperial Stout for that purpose (Fig 6). Added 0.5 cup of Imperial Stout and made another batch of candy syrup as described above. There was a minor disadvantage with this candy syrup already, it foamed a lot (Fig 7). One had to be really careful to prevent an over boil and we had to stir once in a while.

Syrup8

Fig 7: Beer based candy syrup foams a lot…

Another disadvantage was that the whole mixture was dark already. Therefore no chance to observe any color changes at all. A blind flight. But the previous two batches gave us enough courage to simply follow the temperatures and add water at 143°C (290°F). Then re-heating the mixture to 116°C (240°F) and then fill the syrup in glass jars.

After the syrups cooled down, a first tasting (we could not wait to try the syrups).

Let me begin with the reference, the Brewferm Candy Sugar we used up to now. This is a very brown syrup with a relatively low viscosity. Much like liquid honey. The syrup smells like pears, figs and raisins. On the palate again pears, figs and some caramel. Even some minor toffee character. Baseline set.

Next, the table sugar based candy syrup. This syrup is already darker than the reference and very sticky and way more viscous. Faint aroma (couldn’t detect anything). Huge caramel, some toffee and pears again on the palate. Less sweet as well. And beside the caramel and toffee, less intense than the reference.

Moving on to the raw sugar candy syrup. Darker again with a nice red shine to it. Very viscous again but less viscous than the table sugar syrup. More intense aroma than table sugar syrup but we could not put the aroma into words. It smells fruity and maybe even some decent smoke, wood character. On the palate huge pear aroma, some bitterness and burnt character. Some toffee, caramel and coffee? Really hard to describe.

At last to the Imperial Stout based syrup. Really nervous. This is like the experiment where one could expect either a complete disaster or something unique. Lets see. Similar viscosity as the reference. Huge chocolate aroma, smells like a milk coffee and some malt character as well. The character of the beer seems to overpower the smell of the syrup. Palate: Pear, figs, chocolate, no roast character, not bitter, cold coffee. Wow! Way more character than the previous three syrups. Even a spicy character in there and some wood. Simply amazing.

Comparing all the four syrups, the most interesting one is definitely the one made with beer. It even out-rules the reference syrup. Actually, we were not expecting that at all. Our goal was to make some candy syrup to see how the process works and maybe find a decent homemade-syrup substitute for the Dubbel. In our opinion, both the table sugar and raw sugar candy syrup could work as substitutes for the Brewferm candy syrup. However, the Brewferm syrup still tastes a bit better. This is not true for the beer syrup. Simply something unique. Not only has the beer increased the overall flavors of the syrup but the beer contributed some of its own character to the syrup as well. This opens a lot of opportunities for making new varieties of beer based candy syrups. Not only could we experience that the base sugar makes a difference but even the liquid does as well.

Thanks to our supplier who could not supply us with the candy syrup. Would one still call this a supplier?!? We might have never came up with this beer-based candy syrup idea after all. Let me know if anyone else has tried this before. Thanks for reading and commenting, stay tuned!