#24P Belgian Blond Ale

Eureka, yet another post about a recipe from the old days. April 2011 in this case. I would like to upload all the remaining recipes up to batch #50 in the future (three to go) to have a complete list of recipes available. After batch #50 only the most interesting, experimental recipes will be posted. I decided to put more effort into publishing yeast related stuff to give yeast ranchers, hunters and gatherers more information. Back to the recipe of today. The principal goal of this recipe was to further test Wyeast’s strain 3522 Belgian Ardennes. One of my most favourite yeast strains so far. In addition, I used propagated 3522 yeast stored in isotonic sodium chloride solution for the first time here. Never made a batch with stored yeast before. The recipe is not very complicated and therefore makes it easier to detect any yeast originating flavors.

Recipe: Belgian Blonde Ale
Numbers: Volume [L] 5 (1.32 gal)
Original gravity 13.5°P (1.054)
Terminal gravity 4.5°P (1.017)
Color Around 4 EBC
IBU 27 IBU
ABV 5.8% (v/v)
Grains: Pilsner malt (4 EBC) 0.73 kg
Wheat malt (4 EBC) 0.4 kg
Table sugar (0 EBC) 0.086 kg
Hops: Styrian Goldings (6.1% AA) 6 g and boil for 90 min
Hallertauer (4% AA) 5 g and boil for 60 min
Yeast: Wyeast’s #3522 Belgian Ardennes
Water: Burgdorf Mash: 2.8 L (0.74 gal), sparge: 5 L (1.32 gal) @78°C (172°F)
Rest: Mash in @64°C (147°F),
60 min @64°C (147°F),
10 min @ 78°C (172°F)
Boil: Total 90 min
Fermentation: Primary 14 days @20°C (68°F) in plastic fermenter
Secondary 1 month @20°C (68°F) in plastic fermenter
Maturation: Carbonation (CO2 vol) 3 with sugar addition (34 g sugar to 3.5 L beer)
Maturation time 21 days

04/02/2011: Another small batch brew day. All the grains were crushed and mashed in at 64°C. The sugar is added at the end of the boil. Everything else like rests and hop additions are mentioned above. I then added enough of WY3522 yeast and left the fermentation go for 14 days until I racked the beer into a secondary fermenter and let it ferment out and mature for another four weeks.

05/16/2011: Bottled with some fresh yeast and sugar to a carbonation level of 3 vol of carbon dioxide. I then stored the bottles for another few weeks at room temperature.

08/30/2011: Beer now close to four months in the bottles. Tasting:

Aroma: Lots of pineapple… Light sweet character as well. No hops, no malt.

Appearance: Yellow-golden color, some particles float in the glass (grains!!!), lightly hazy and fast disappearing head… Not very nice to look at. (Looking back, I brew in a bag for small batches now to avoid such appearance problems)

Flavor: Pineapple, watery…

Mouthfeel: Light body, average carbonation and malty, sweet finish.

Overall Impression: Really bad appearance and rather one-dimensional (who would have guessed). I wonder why so much pineapple is detectable in such a beer. I never had pineapple with this strain before. Reading Wyeast’s description of WY3522 Belgian Ardennes, this strain seems to be rather balanced. Some esters and spicy notes. But I could not detect any spicy notes here. Maybe because of a lacking ferulic acid rest? I am not sure if any off-flavor has a distinctive pineapple aroma. Please let me know if this is the case. Anyway, I don’t really have an explanation for pineapple aroma.

To summarize, this experiment did not lead to any conclusive results. Just a pineapple driven beer. I am somewhat used in my every day live that some experiments lead to inconclusive results or not to the results you were expecting. This might be because your expectations were not correct or due to a bad experimental design. Nevertheless, I could at least show that a yeast stored in isotonic sodium chloride can ferment a beer.

The next post will not be about a recipe. I haven’t decided which post I am going to publish next because this depends on the latest results. However, it will be about yeast. Promised!

#65 Smoked Oatmeal Stout

Eureka, today’s post is all about one of our most improved recipes so far. As a fan of Stouts I really wanted to create an excellent example. This is basically the next improvement step of the #49 Belgian Oatmeal Stout. Although the #49 recipe gives you a great Stout, I still wanted to keep on improving the recipe to a next level: Adding a Islay smoked twist to it. The recipe is very similar to the previous version but I used a different yeast and some Whisky malt instead. The previous version was quite well made in my opinion and I saw no need to change the grist any further. Lets go through the recipe.

Recipe: Wellington Boots Smoked Stout
Numbers: Volume [L] 19 (5 gal)
Original gravity 13.9°P (1.055)
Terminal gravity 4°P (1.015)
Color Around 69 EBC
IBU 31 IBU
ABV 5.4% (v/v)
Grains: Pale malt (6.5 EBC) 4.3 kg
Flaked oat (0 EBC) 0.45 kg
Chocolate (700 EBC) 0.34 kg
Roasted barley (1150 EBC) 0.23 kg
Cara Crystal (120 EBC) 0.23 kg
Whisky malt (10 EBC?) 0.6 kg
Hops: EKG (5% AA) 51 g and boil for 60 min
Yeast: Wyeast’s #1084 Irish Ale
Water: Burgdorf Mash: 14 L (3.7 gal),
sparge: 19 L (5 gal) @78°C (172°F)
Rest: Mash in @66°C (151°F),
60 min @66°C (151°F),
10 min @ 78°C (172°F)
Boil: Total 60 min
Fermentation: Primary 13 days @20°C (68°F) in plastic fermenter
Secondary N/A
Maturation: Carbonation (CO2 vol) 2 with sugar addition
Maturation time > 3 weeks

09/09/2012: Batch number 65. All the grains and flakes went into the water at 66°C and rested for one hour at 66°C. Then increased the temperature to 78°C for mash-out. Then did a fly sparge as usual and collected the black wort. 65_1After all the runnings were collected, I waited for the first signs of boiling to occur and added the hops as mentioned above. I always like to brew dark beers not only because they taste great but because some beautiful things occur during the brew day such as the surface shown in the wort kettle before reaching a boil.

65_2After a 60 min boil the wort was cooled down to approximately 20°C (68°F) and a healthy amount of freshly prepared WY1084 Irish Ale yeast was added.

09/22/2012: After 13 days of primary fermentation the beer was bottled already. No secondary fermentation because we planned to store the beer for some time in the bottles anyway. Another thing we changed to the previous recipe was the amount of carbon dioxide. This time we went with a traditional Real Ale carbonation level of 2 vol of carbon dioxide. In my opinion Stouts with a lover carbon dioxide level are more drinkable and therefore easier to enjoy.

01/07/13: First official tasting after a maturation time of nearly three months. We tasted the Stout before but never put it on paper.

Aroma: Very phenolic and smoky. The Whisky malt gives this brew a really nice aroma profile. All other typical Stout aromas such as chocolate, coffee or any roasted notes are somewhat in the background and nearly not detectable.

WellingtonBootsInGlassAppearance: Pours in a black color, 1 finger tan and creamy head, some bubbles rise to the top. A typical Stout appearance in my opinion.

Flavor: First thing you notice are the roasty, chocolate notes. Followed by the peaty, smoky character of the Whisky malt. Incredible what the low amount of smoked malt can already contribute to such a beer.

Mouthfeel: Medium body with a low carbonation level. Rather dry and smoke and silky. Really palatable.

Overall Impression: This beer has to be enjoyed at a relatively warm temperature. Otherwise the character of this beer is rather boring.

Quite interesting what 10% of Whisky malt can contribute to such a beer. The smokiness is well-integrated and not overpowering. I gave this beer to friends and used it for a tasting and a lot of people liked it. And some of them do not drink beer on a regular basis. But some of them are Islay Whisky lovers and therefore really like the peaty notes in this beer. The level of smoke seems to be just right. Some told me that a higher smoke level would be less enjoyable. Although I would love to further increase the amount of Whisky malt to see what happens. All in all I am quite satisfied how this brew turned out. What I learned is that Stouts work better at lower carbonation levels and 10% of Whisky malt lead to a well incorporated smoke level.

I am quite certain that this is not the end of my journey to improve my Stout recipes. For now it seems that I am on the right track. However, I haven’t decided yet what to further improve here. Luckily there are some other recipes in our pipeline which need further improvement. Thanks for reading

Insight into the Brettanomyces Mitochondrial genome

Eureka, I have to mention first that this is a very scientific biochemistry, bioinformatics post about Brettanomyces. However, I hope those of you with less biology experience can follow as well or at least get the idea of the main messages. This post is mainly about an insight into the mitochondrial genome of two Brettanomyces species and comparing those sequences with Saccharomyces.

I always wondered how similar the genome sequence of a Saccharomyces cerevisiae and Dekkera/Brettanomyces yeasts are. To do such comparisons the DNA sequences have to be published first or at least sequenced. I am not yet through all the publications about the Brettanomyces genome sequencing and therefore don’t know yet if any complete genome of Brettanomyces/Dekkera is available at the moment. More about the yeast genomes in future posts.

I would like to start with a quick introduction about the whole topic to give those without a biology background a chance to understand the following points. This post is about comparing different DNA sequences from different yeasts. You might know that every living organism contains DNA which can be seen as the manual of the cell. The DNA encodes nearly everything the cell needs to work such as proteins, different RNAs etc. The whole DNA within a cell is commonly called genome. The DNA consists of four bases: Adenine, guanine, cytosine and thymine. In the DNA every information is encrypted with these four bases. The code to decipher the information from the four bases code into a protein is called the genetic code. If the genetic code is known you can encode a DNA sequence into proteins. Or vice versa. Before one can encode a DNA sequence the sequence has to be known. And this is the process called DNA sequencing. By DNA sequencing you determine the sequence of the four bases in the DNA. Knowing DNA sequences is very important for modern biology to for example understand certain diseases. On the other hand, DNA sequences are in general very specific for every living organism. This can be used to detect certain organisms. I hope this is enough information for the beginning.

One disadvantage of sequencing genomes of yeasts is their size. Sequencing big genomes is always challenging. Before modern techniques such as shotgun sequencing came widely available the only way of sequencing large genomes was really time-consuming and thus really expensive. This is different today and a lot of people around the world are working on sequencing projects. Me included.

To compare any genomic sequences or get any information about the evolutionary relationship of Saccharomyces and Brettanomyces, one has to look at the DNA of the two yeasts and compare them. And since I don’t know yet if the full genome sequence of at least one Dekkera/Brettanomyces strain is sequenced one has to look at a different DNA. And that’s where the mitochondrial genome comes into play. Mitochondria are the organelles in the cell responsible for several pathways such as supplying the cell with energy. And mitochondria have their own DNA, called mitochondrial DNA (mtDNA) because mitochondria originate from bacteria cells (see endosymbiotic theory). To summarize this theory, some time ago a cell incorporated a bacteria cell and the incorporated bacteria cell lived on within the first one and became the mitochondria. And since the mitochondria was a bacteria cell with DNA, the DNA still exists in some part within the mitochondria. The whole amount of this mtDNA is then called the mitochondrial genome. Because mtDNA are relatively short compared with the genomic DNA of a yeast, sequencing mtDNA is relatively easy. The first sequencing of a mtDNA sequence of D. bruxellensis and B. custersianus has been completed by E. Procházka et al in 2010 [Procházka et al, 2010]. All the data below is from this publication.

Since Saccharomyces cerevisia is an eukaryotic model organism for scientists, the whole genome of this yeast is already sequenced. Including the mtDNA. The mitochondrial genome sequence has been published and can be found here under the accession number AJ011856. For D. bruxellensis (strain CBS 2499) the sequence is deposited with the accession number NC_013147. And for the B. custerianus strain (CBS 4805) with the accession number GQ354525. If you look at one of the deposited genomes you can see the sequence at the bottom of the entry.

Lets begin with a look at the mtDNA of Saccharomyces cerevisiae. One can see that the mtDNA is circular and 85779 bp long (Fig 1). All the red arrows represent a specific gene encoded on the DNA. I only included the genes because with all the other annotated stuff such as tRNA etc the picture would simply be unreadable. One can observe that it seems that all the genes are facing in the same direction. This simply means that only one strand of the DNA is used for coding. (DNA is double stranded).

saccharomyces

Fig 1: mtDNA Saccharomyces cerevisiae

Moving on to D. bruxellensis. Again a circular mtDNA (Fig 2). By the way, the publication mentioned above was the first to demonstrate that the mtDNA in Brettanomyces is circular. This mtDNA is 76453 bp long and includes a lot of genes as well. However, some genes face a different direction than others. The mitochondrial genome in D. bruxellensis therefore uses both strands as coding strands. This is already different compared to S. cerevisiae in Fig 1.

bruxellensis

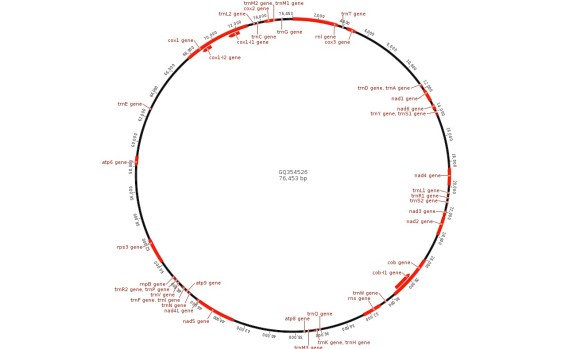
Fig 2: mtDNA D. bruxellensis

And at last a quick look at the mtDNA in B. custersianus (Fig 3). Yet again a circular mtDNA with a length of 30058 bp. This is much shorter than in S. cerevisiae and D. bruxellensis. And yet again, the genes are read on only one strand.

custersianus

Fig 3: mtDNA B. custersianus

Lets briefly summarize the first few observations and lets compare them. All the mtDNA genomes are circular. The sizes in S. cerevisiae and D. bruxellensis are more or less the same. The mtDNA in B. custersianus though is significantly shorter than the other two yeasts. On the other hand the genes in both S. cerevisiae and B. custersianus are one single strand and genes in D. bruxellensis on both.

All these observations already tell me that these three yeasts are really not the same based on their mitochondrial genomic setup. One might argue about the size differences but the different gene orientation is quite remarkable in my opinion.

Moving on with further comparisons. Below is a table with the number of genes encoded in the mitochondrial genomes in all three yeasts and the number of tRNAs (transfer RNA). If you don’t know what tRNAs are just don’t bother. I will not get into any details about these tRNAs in this post.

S. cerevisiae D. bruxellensis B. custersianus
Genes (including tRNA) 42 46 47
tRNA 24 25 25
Genes (without tRNA) 18 21 22

By just looking at the number of genes one might already tell that there seems to be a difference in the number of genes without tRNAs between S. cerevisiae and Brettanomyces/Dekkera. All the mitochondria seem to have roughly the same number of tRNAs. I will not get into further detail about the tRNAs here. If you need further information please have a look at the original publication. I would like to talk about the differences in genes instead.

Lets have a closer look at some of the genes encoded in the mitochondrial DNA in the three yeasts. Please keep in mind that over 99% of the proteins present in the mitochondria originate from the cytosol: Newly synthesized cytosolic proteins are transported from the cytosol across the outer membrane by the TOM40:TOM70 complex. Thus the mitochondria DNA does not have to encode for a lot of proteins as it can easily be seen by looking at the table above.

The following genes are encoded within the mtDNA:

  • Cytochrome oxidase subunits 1, 2, 3 (cox1, cox2, cox2)
  • Apocytochrome b (cob)
  • ATP-synthase subunits 6, 8, 9 (atp6, atp8, atp9)
  • Mitochondrial small and large rRNAs (rns, rnl)
  • RNAse P (rnpB)
  • Mitochondrial subunit ribosomal protein 3 (rps3)

A lot of these proteins can be found in S. cerevisiae as well. But this does not mean the DNA sequences are the same though. More about that later on. Indeed there are some genes only encoded in the two Brettanomyces/Dekkera mtDNAs:

  • NADH dehydrogenase subunits 1, 2, 3, 4, 4L, 5, 6 (nad1-4, nad4L, nad5-6)

This is an enzyme complex (also known as respiratory chain complex I) and catalyzes the reaction of NADH to NAD+.

The next question to answer is if the genes found in both yeast species have the same sequences or not. I would like to look at one set of genes.

Cytochrome c oxidase:

The cytochrome c oxidase complex consists of three different subunits, subunit 1 to 3. Cytochrome c oxidase catalyzes the reduction of oxygen to water and plays a very important part in the respiratory chain. Below is a table showing the length [bp] of the different genes.

  S. cerevisiae D. bruxellensis B. custersianus
COX1: cytochrome c oxidase subunit 1 12884* 5348* 5436*
COX2: cytochrome c oxidase subunit 2 756 738 744
COX3: cytochrome c oxidase subunit 3 810 810 810

Both yeasts have the three subunits encoded in their mitochondrial DNA. However, in D. bruxellensis subunit 1 has 3 exons, 4 exons in B. custersianus, and 8 exons in case of S. cerevisiae. The CDS (coding sequence) in D. bruxellensis and B. custersianus are 1629 bp and 1605 bp long in S. cerevisiae.

Comparing the two protein sequences of the Brettanomyces/Dekkera strains shows a pairwise identity of 85.1% (MAFFT alignment). For the other two subunits 2 and 3 in the two strains 88.8% for COX2, 81.9% for COX3.

Comparing COX1 from D. bruxellensis with S. cerevisiae shows a pairwise identity of 70.3%. COX1 from B. custersianus and S. cerevisiae are 70.5% identical.

Comparing COX2 from D. bruxellensis with S. cerevisiae shows a pairwise identity of 75.8% (Fig 4). COX2 from B. custersianus and S. cerevisiae are 73.9% identical.

Comparing COX3 from D. bruxellensis with S. cerevisiae shows a pairwise identity of 70.4%. COX3 from B. custersianus and S. cerevisiae are 70.1% identical.

alignment

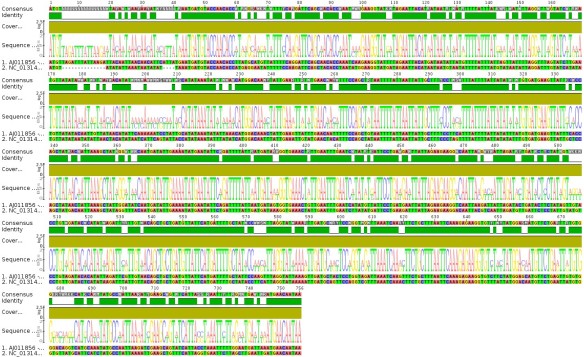
Fig 4: Comparing COX2 from D. bruxellensis with S. cerevisiae shows a pairwise identity of 75.8%

This is a very nice example that all the three yeasts have the same protein function (cytochrome c oxidase) but the sequences are not the same and not even encoded the same way (different exons) or direction (as shown above). On the other hand not even the two Brettanomyces/Dekkera strains have the same sequences. Still the sequences are more identical in the two Brettanomyces/Dekkera strains than compared to S. cerevisiae.

Putting this all together, the three different yeast strains look very different at a molecular level (different size, using two strands as coding strands). The genes don’t even have the same exact sequences. In the end all the yeasts produce proteins with the same function. This is quite remarkable in my opinion. Another big difference between S. cerevisiae and Dekkera/Brettanomyces is the existence of the NADH dehydrogenase in the latter yeasts.

I hope this post was not too complicated and got you some ideas about the different genetic setup of Saccharomyces and Brettanomyces/Dekkera. In the end all the yeasts achieve the same but all with a different setup. This is simply remarkable and in my opinion a brilliant example how evolution impacts an organism. Not to say that even within the same species such as Brettanomyces/Dekkera two different strains (D. bruxellensis and B. custersianus) might have very different setups as well. This makes me wonder what a look at the genomic DNA might reveal…

I would like to end by mentioning that this is a nice example to show people what one can do by just looking at DNA sequences and why it is important in my opinion to sequence organisms in the first place. Such insights are not possible if no DNA sequences are available. Don’t expect the genomic Brettanomyces DNA insight soon. This will take me much longer to prepare because there is much more data to process…

Bibliography

  • E. Procházka, S. Poláková, J. Piskur and P. Sulo, 2010. Mitochondrial genome from the facultative yeast Dekkera bruxellensis contains the NADH dehydrogenase subunit gene. FEMS Yeast Res, 10, 545-557 (Pubmed)

Trinity: A brewery tour, building a brewery and future of this blog

Eureka, I finally managed to write a post about our current (2013) brewery. I would like to take you on a tour through our small brewery and show you some of our equipment. And I have to share some information with you concerning the future of this blog. But first about the brewery. In Switzerland you have to pay alcohol taxes on your homebrew if you brew more than 400 L (106 gal) a year. We easily brew more than that and therefore belong to the tax-paying breweries in Switzerland. And you get a license number (in our case 469) but are not allowed to sell beer. You just have to pay taxes… To be able to sell your beer is a totally different story and very time and money consuming to get there. However, we would really like to sell some of our beers in small quantities in the future and we are already working on different fronts to get there.

Because you have to add a brewery name as you register for the tax licence number, we had to think about the future a bit. Sure Eureka Brewing would be very obvious. However, because of different reasons we finally came up with the name Blackwell Brewery. The Blackwell Brewery therefore is our official brewery name and was founded by my brother and me in 2012. Oh, we even have a website of our future brewery (bilingual) and a nice logo:

Cool, right? We even have some pretty neat labels such as the black one shown below for the special releases

Rusalka Imperial Stout Batch 2012and a white version for the occasional releases. I am very proud that we came up with the label design on our own…

Wellington Boots Smoked Stout Batch 2012Before we head into the marathon to finally have the license to sell beer, we first work on our basic recipes to have some nice basic recipes. The next steps would be to tweak them and implement some unique twists. As we do not want to invest in a bigger brewing equipment (yet?) and just sell really small amounts (lets say 50% of a batch), we do not have to brew the same recipe over and over again. We and a lot of our present consumers (they drink our beers in the brewery) like the diversity. We will still brew the stuff we like. Not what others like. In the end, we do not want to earn a lot of money with or brewery. Just enough to brew further more exciting batches. Maybe going professional is an option in the future? We will see.

Setting up the Blackwell Brewery took us a lot of time and this is only one reason why I haven’t posted a lot of posts recently. But now the whole things seem to be fine so far and I now have some time to spend for other things such as my research work, brewing and beer microbiology. One might ask what will happen with this blog in the future. Well, despite going partially pro here, I will still post about all our recipes (well the most interesting ones) and other stuff we do. I really like the homebrewery community and discussions and like to share recipes and experiences. Even if we sell the beers. We do not care if even a bigger commercial brewery use our recipes (a lot of them are basically not my owns as well). We still have enough ideas and like to live an open recipe policy. So no worries, the blog will go on as usual. Enough of news, lets start the brewery tour.

Brew house

Fig 1: Weck kettle

We first started brewing with a kettle similar to the one shown in Fig 1 in 2006. The one shown in Fig 1 has an additional electrical heating source and can hold about 25 L (6.6 gal). However, the first kettle had no such heating source and we had to heat up and boil the wort on the kitchen stove which took a lot of time. We therefore purchased the kettle in Fig 1 to be independent of the kitchen stove. We still use this kettle for most of our batches because it is very easy to use and no gas is used.

Fig 2: The real kettle

In 2010, my brother and I decided to get ourself some bigger kettles and purchased two 50 L kettles (13 gal) and two gas burners (Fig 2). This is the equipment we use for bigger batches.

Fig 3: PLC sytem

You might have seen our PLC (Programmable Logic Controller) system before (Fig 3). This is basically an automated mashing system. You only have to program the PLC with your mash schedule, press start and wait until the mash schedule is done. We used this system a few times and it works very well. However, I used some parts of the PLC system for my new kegerator. The kegerator was more important than the PLC. Therefore no PLC anymore. In addition, the stirrer broke a few months (or years ago), we bought the spare parts but never put the motor back together. Today we just occasionally stir the mash by hand. So no stirrer necessary. If the PLC is ready to work again, we will have to fix the stirrer as well.

Fig 4: Lauter equipment 1

Next about our sparging equipment. We first used the equipment shown in Fig 4 for sparing. This is basically a bucket with a false bottom and sprinkling device to evenly distribute the sparging water on the grain. This system worked but we had a lot of problems with stuck mashes. We therefore purchased a false bottom for the big kettles and use the big kettles as lautering kettles (Fig 5). Works very well now.

Fig 5: False bottom

To boil the wort we use either the kettle shown in Fig 1 or 2. Depending on the batch size. Sure the heating times with the gas burners are way shorter than with the electrical kettle. But I see no problem here. I do not like to rush through a brew day anyway.

A typical two-batch brew day can look like shown in Fig 6: One big kettle can be used for mashing (with the stirrer motor) and the other one as a lautering kettle (first batch). We collect the wort from the lautering kettle in the kettle shown in Fig 1 and use the very first kettle we owned (similar to the one in Fig 1 without a heating source) to prepare the sparing water. A pretty nice equipment in my opinion. We not only have the equipment to brew two different batches a day but have the possibility to brew different batch sizes as well.

Fig 6: Brew day

This will be our brewing equipment for a very long time. We do not intend to buy additional kettles or bigger ones. It just works fine now!

After the boil we either use(d) an immersion chiller or a plate chiller. We tend to use the plate chiller because the chilling is faster than the immersion chiller (in our opinion).

Fig 7: Fermenter

Fermentation. For the fermentations we normally use HPTE plastic fermenters (Fig 7). We have several of them and in different sizes. Normal size is 30 L (7.9 gal). In addition three smaller ones with a volume of 15 L (4.2 gal) for split batches or any other experiments. As we do sour beers occasionally, we have a separate 30 L and 15 L fermentation vessel for sour beers only. And some glass carboys as well.

I am quite happy with these fermenters because they are easy to handle, easy to clean, not heavy to lift and rather cheap. On the other hand, glass carboys are rather expensive and the type of glass carboys commonly used by US homebrewers are not available around here (or at least I haven’t found a source yet). This is why I use these plastic fermenters.

I use these fermenters as primary and secondary fermentation vessels. Sometimes the beer is in these vessels for a couple of months and I could not pick up any oxidation signs in any of my beers.

The cellar

The cellar is more or less a mess. We store a lot of beer down there (actually 271 L (72 gal). I had to do an inventory… for the tax-guys. And that’s what came out going through our cellar. It took me a lot of time to go through all the boxes with old experiments, old batches for further maturation and count them all. Anyway, it is done for this year and another inventory will follow next January. Next to beer is a bunch of fermenters down there with fermenting beer. Sorry for the bad picture quality. The light down there is not very good to take any pictures.

cellar1
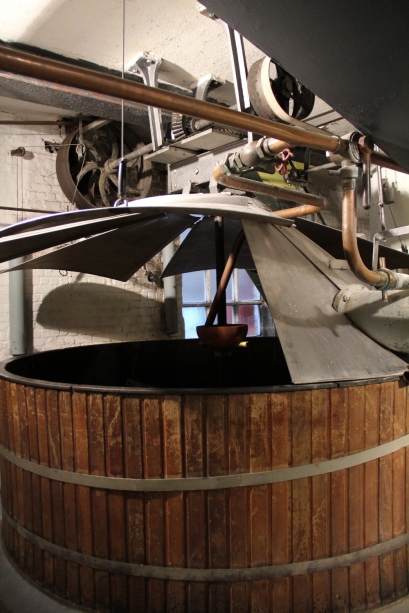
In the picture above is a small part of the fermenters. On the very left side with the beautiful pellicle is the 2012 Solera. The fermenter with the wooden plug contains the #38 Flanders and the other four fermenters on the right contain the #50 Flanders batch. This is the batch where I split the beer into four different fermenters to find out if there is a difference between the plastic fermenter and glass and in addition if the addition of commercial dregs to the Wyeast Roeselare blend have any impact on the flavor.

IMAG0959Then right next to the Flanders fermenters are the #57 Lambics fermenting away. I split this batch as well and added some of my isolated bugs in some of them to again test their ability to have any impact on the finished product. These kind of experiments are great deal of fun and I already created a really great wild organism blend called Milupa 1 which is working on the Solera, the one with the nice pellicle.

In front of the fermenters are bottles with my latest Belgian Quadrupel batch (brewed in late 2012). I even added some Brettanomyces to some bottles to see what happens.

Next is another cool and very recent experiment. Our Whisky barrel which currently contains the #67 Koschei Imperial Stout. I don’t know how long this beer will stay in the barrel but at the moment it seems like bottling time is in the near future and we have to think about another beer to fill the barrel.

Koscheivat

We do not bottle all our batches because we do not have that many bottles. And because it is much easier and faster to just fill a keg with fresh beer and then hook it up to our tap line. We built ourselves a kegerator a few years ago for a summer party and this was the star of the summer party. Well the beer was fantastic as well and most people just wanted to use the tap… and this might be just one reason why a lot of the beer got consumed that day.

IMAG0657Well, this is the end so far. I hope you know have a clearer idea what our equipment looks like and what experiments are currently running. Hope you enjoyed reading this long post and stay tuned!

By the way, the Blackwell Brewery will be no further topic here. We cover all the Blackwell Brewery related stuff on the respective page and just have put a link there to this blog for all the people interested in reading about our experiments, recipes or wild souring stuff. Cheers and thanks for reading

Beer Travel – Brussels Part 3

Eureka, and we already get to the last post about my latest trip to Brussels. If you haven’t read the previous two check out this page. Now, I only mentioned that the third post will be about a brewery resident in Brussels. And if you know me and Brussels well enough you already guessed the brewery. It is…”drum roll”… Cantillon. The pictures below are courtesy of my brother and most of the information are taken from the pamphlet you get for the brewery tour.

IMG_0946Cantillon is one of the remaining traditional Lambic breweries in the world and is still a family business founded in 1900 by Paul Cantillon now within Brussels. They still use the old brewing equipment and brew an average of 1700 hectoliters (1450 barrels) of beer a year. In the 1960ies Jean-Pierre Van Roy carried on brewing and today Jean Van Roy is taking care of the legendary brewery. As we visited the brewery both Van Roy’s were present and Jean-Pierre Van Roy himself gave the brewery tour…

The brewery is open for visits. You pay a small entry fee and get a nice 15 page pamphlet with some information about the brewing process and the products of Cantillon and two vouchers for a beer tasting after the tour. The brewery tour begins in the brewing area.

IMG_0888For the mash they use 35% raw Belgian wheat and 65% malted barley. They mix the grains with water and hold the mash temperature for 2 hours and steadily rise the temperature from 42°C to 72°C. They then lauter with hot water and collect the wort in the hop boiler upstairs. IMG_0893

The hop boiler is made of copper and is heated by steam and has a propeller to mix the hops with the wort. They cook the wort for 3 to 4 hours with aged hops. During the boil they lose 2500 L due to evaporation from an original wort volume of 10000 L. After the primary fermentation the alcohol level is at approximately 5 ABV. IMG_0898Next you climb up into the attic of the brewery. Up there they store their malt and wheat supplies and the hops. And there is the coolship were all the magic happens. After the boil the 7500 L of hot wort are pumped into the coolship to cool down. The large surface area helps to cool down the wort relatively fast. The cooling is done over night during the brewing season of October to April. During the cooling process a broad range of wild yeasts, bacteria etc. fall into the cooling wort. And these microorganisms lead to the spontaneous fermentation and in the end to the flavors in the finished product you either love or hate. It is mentioned in the pamphlet that over 100 different yeast strains, 27 acetic acid bacteria and 38 different lactic acid bacteria have been found in a single Lambic.

In the morning, after the wort cooled down to 18 to 20°C the wort is transferred into a stainless steel fermentation vat for the primary fermentation. IMG_0910After the primary fermentation the beer gets transferred into oak or chestnut casks.

IMG_0930IMG_0932Cantillon use casks which have been used by wine makers or Cognac producers. Once in the barrels the fermentation continues and a lot of foam and carbon dioxide escapes from the barrel as it can easily be seen in some of the pictures above. There was a lot of hissing noise in this room with the barrels above and a very nice smell in the air. The next pictures shows is more clearly…

IMG_0927The vigorous fermentation slows down after some weeks and the barrels can be sealed. Now begins the maturing process which can take years.

IMG_0924Lambic is beer straight from the barrel and thus contains no carbonation at all. On the other hand, Gueuze is a blend of Lambics of different ages. Due to remaining sugars in the young Lambic (1-year-old) the fermentation in the Gueuze goes on and provides carbon dioxide to carbonate the beer. The 3-year-old Lambic provides the taste in the Gueuze. Yet another product of Cantillon are fruit beers. Lambics with fruits such as sour cherries, raspberries, grapes or apricots. The fruits (150 kg) are added to 500 L of 2-year old Lambic during the summer season (July to August). The fruits then stay in the Lambic for at least another three-month before the fruit beer is bottled. For bottling young Lambic is added again to supply the carbonation in the bottle. Lambics with sour cherries are called Kriek, with raspberries Framboise and the ones with grapes and apricots are somewhat specific for Cantillon. Vigneronne for the one with grapes and Fou’ Foune with apricots.

Lambic is not made within some weeks like many top fermented beers. Patience is needed like stated by the sign below. Freely translated as “Time doesn’t respect those doing without it”

IMG_0917And if you heard the story about the cobwebs in a Lambic brewery before, this is definitely true for Cantillon. There is this story that a lot of insects might harm the maturing beer and instead of using insecticides a lot of the brewers rely on spiders taking care of these insects. And thus Lambic brewers leave any cobwebs intact. However, have a closer look at the following barrel…

IMG_0922It might be hard to see but there are some sort of maggots around the plug enjoying the dripping Lambic… Enough of weird stuff.

The tour ended in the barrel cleaning room and the bottling facility. Interestingly, Cantillon steam treats all their barrels prior to refilling. Thus killing any of the micro flora in the barrel formed during the last fermentation.

After the beer is bottled, the bottles stay another few months in the brewery which can easily be seen as you begin your brewery tour walking by huge bottle piles. IMG_0939After the amazing tour and a small talk with Jean-Pierre Van Roy it was time for a tasting. IMG_0943– Lambic straight from a barrel: Very pale color, not a lot of funky or sour aroma in the nose. On the palate some minor Brettanomyces notes but not (very?) sour. I encountered this before as I tasted a Lambic brewed by Girardin and was surprised that the Lambic after spending a year in the barrel is not sour.

– Gueuze: Blend of Lambics. Pours with a pale color as well (picture above, glass on the very left side). In the nose the beautiful character one expects from a Gueuze. Lactic and acetic sourness, lots of barnyard, earthiness and some leathery smell as well. On the palate a decent sourness combined again with a funky earthiness. What a treat!

– Kriek: Lambic with sour cherries. Pours with a red color (glass on the right side in picture above). Some cherry character in the nose with the additional sour lactic vinegar notes. On the palate a lovely cherry bouquet complemented with a decent amount of sourness. Not sweet as modern Krieks are.

– Iris: Brewed with pale malt and spontaneously fermented and dry hopped with Saaz hops. Pours with a darker yellow color (glass in the middle in the picture above). I never had this beer before and was quite amazed how awesome the Saaz hops work with a sour beer like this. It gives the beer a very nice spiciness. The Saaz hops are definitely detectable on the palate as well. Fantastic!

Luckily for me I already had a lot of the Cantillon beers before visiting the brewery. The only ones still missing are the Vigneronne (the Lambic brewed with grapes), the Saint-Lamvinus (Lambic brewed with Merlot grapes), the Fou’ Foune (Lambic brewed with apricots) and the Faro (Lambic blended with caramel and candy sugar). Unfortunately, none of the beers above were available at the brewery shop expect from one, the Fou’ Foune. So I went home with a 0.75 L bottle of Fou’ Foune and wait for an opportunity to open the bottle… Luckily the bottle survived the flight back home.

I know I am very lucky to get Cantillon beers in the first place and to have the opportunity to pay a visit to the brewery. Anyway, as I walked through the storage space of the brewery I saw three euro-pallets like the one below:

IMG_0938Maybe there is your next Cantillon bottle in there somewhere? I hope so.

I am very happy about the visit and will definitely go there for another visit in the future. The beers they brew are just amazing, although some of the visitors had a funny face expression as they lowered their noses in the glasses for the very first time. Cantillon is a definite must if you ever are in/around Brussels. Even if you are not into the whole Lambic/Gueuze stuff. It is an experience and who knows maybe some day you really like to drink a traditional Gueuze, Lambic or fruit Lambic as well. The only thing I would love to do is take some agar plates with me next time… Thanks for reading and stay tuned for further posts.

IMG_0945

Beer Travel – Brussels Part 2

Eureka, the journey goes on. This post is the second one in the Beer Travel log of Brussels. Today’s post is all about Brussels and beer. No further introduction because this post will be long enough already. All the pictures below are courtesy of my brother.

Moeder Lambic Fontainas

brussels3

Fig 1: Welcome to Moeder Lambic

Moeder Lambic runs two craft beer bars in Brussels. The one we visited was Moeder Lambic Fontainas with 46 beers on tap…

Sure we could not try all the 46 beers. We nevertheless tried Grisette’s Fruits de Bois brewed with wild fruits, Val-Dieu Noël, Tournay Noel, de Ranke Hop Harvest 2012, de Ranke Kriek and de la Senne’s Band of Brothers. If this was not enough yet, we ordered a bottle of Stone’s Old Guardian from 2010. This was my very first Stone brew and I was not disappointed at all.

Maybe some words about the bar. The bar is located in the East of the Grand Place and the interior design is very modern and very well made. We sat at a wooden table at the very end of the bar and had to climb up there one some Westvleteren 12 cases.

brussels12

Fig 2: Insight Moeder Lambic Fontainas

The bar not only serves a lot of beer on tap but has a huge beer menu as well. To me it seems that the bar focuses mainly on Belgian beers on draught but caries a lot of excellent foreign beers in bottles. Funny enough, if I would have to name two very well made Swiss beers it would have to be BFM’s Abbaye de Saint Bon-Chien or Trois Dames Oud Bruin. And those were in fact the two beers they carry from Swiss breweries…

brussels2

Fig 3: Beer menu of Moeder Lambic Fontainas

Moeder Lambic is definitely a craft bar to visit if you are in Brussels. In fact you could skip all the other bars below but don’t miss out Moeder Lambic. And if you are a bit hungry order a Planchette mixte, a small snack. Maybe some of the best bacon I had in my life. Not only the beer is excellent in this bar but the food is very delicious as well.

A la Mort Subite

Next stop A la Mort Subite. A small pub serving Mort Subite (sudden death) beers located in the centre of Brussels. This bar opened in the early 20th century and the interior is very vintage with some very old wooden tables, wooden chairs which all gives you the feeling of the old days.

brussels13

Fig 4: A la Mort Subite

On draught are Mort Subite’s Kriek (cherry lambic), Faro, Peach, Lambic white and some other Belgian beers. In addition, you can order Mort Subite’s Gueuze and Framboise in bottles. For a complete list of served beers check out their website. We tried the Faro, Peach, Gueuze and Framboise and they were not bad. However, Mort Subite’s beers are sweet. I like the sweet fruit Lambics as well and if you don’t like the sweet Lambics, visit the bar because of the feeling.

brussels7

Fig 5: Mort Subite Gueuze

Delirium Café

This is maybe the most visited bar in Brussels. It seems they have the largest beer menu on the planet with over 2400 beers available.

brussels16

Fig 6: Delirium Café at daylight

This cafe (I would not call this a cafe though) is located in the middle of the city. We wanted to visit the cafe on a Friday evening and the cafe was just filled with a lot of rather young people. To me it looked like a place where young people go out for a drink or two or three… There is nothing wrong with that but this is not the environment I am looking for to enjoy a nice glass of beer in the evening. Or enjoy some craft beer with the distinct pub smell in the air… Maybe I am already too old for this kind of cafe? Anyway, I am not very sad about not drinking a beer in this cafe.

250 Belgium Beer store

This is the only beer store I went to in Brussels and is located at the Boterstraat right in proximity of the Grand Place.

brussels9

Fig 7: Inside a Belgian beer store

I believe they really carry 250 Belgian beers. For me the most interesting section of the store was the Lambic and Fruit beer department. They carry a lot of Lindeman, Liefman, de Troch, Mort Subite, Cantillon and Boon. I might have forgotten other breweries. We bouth ourself Duvel Groen, Lindemans Pecheresse, Gouden Carolus Hopsinjoor, Gouden Carolus Tripel, Cuvée René from Lindemans and a Gueuze made by DeKoninck.

brussels18

Fig 8: Beer hunting…

By the way, the Cantillon Rosé de Gambrinus and the La Trappe Quadrupel are from a souvenir shop.

I would like to share a funny story here. If you had Belgian beers before you might know that a lot of bottles have a cap and a cork. Basically I was aware of that but forgot to take a corkscrew with me. On the first evening we wanted to try the Lindemans Pecheresse but we could not get the cork out of the bottle. This is why I bought myself a silly Manneken Pis corkscrew as shown in the picture below.

brussels19

Fig 9: Manneken Pis bottle before opening a bottle of Cantillon Rosé de Gambrinus

I screwed the spiral of the Manneken Pis corkscrew in the cork of the Pecheresse bottle and after some turnings… the spiral broke off. Luckily the spiral was already deep enough in the cork to get the cork out of the bottle. We then wanted to open the Cantillon Rosé de Gambrinus (with a cork as well) and I used the Manneken Pis to get the cap off… and the thing broke as well. We had to ask the lady from the hotel for a corkscrew to open the Cantillon bottle in the end.

brussels20

Fig 10: Manneken Pis after opening a bottle of Lindeman’s Pecheresse and Cantillon Rosé de Gambrinus

Lesson learned: Take a corkscrew with you or/and don’t buy yourself a Manneken Pis corkscrew… By the way, the Rosé de Gambrinus is fantastic!

I highly recommend to visit the Moeder Lambic and A la Mort Subite bar. Both places serve excellent beers and have a nice ambience. And don’t buy a Manneken Pis corkscrew…

I would like to end this post with the mentioning that there are further beer places in Brussels to visit. I just could not visit all these places within three days. The next and last post in this beer travel log is about a brewery within Brussels. And because this is post number 100, I should enjoy a nice beer after publishing. Stay tuned!