Brettanomyces lambicus microscopy pictures

Eureka, its time for yet another post about Brettanomyces. And today, we are looking at some Brettanomyces lambicus cells. You might remember, that I did some plating of the two Brettanomyces strains from Wyeast: Brettanomyces bruxellensis and Brettanomyces lambicus on Sabouraud agar. And I already posted the results from the microscopy observation of a B. bruxellensis sample. Now is the time to talk about the microscopy observation of the B. lambicus cells from Wyeast.

Lets begin with a few pictures now to get an overview. I will get into further details in the pictures below.

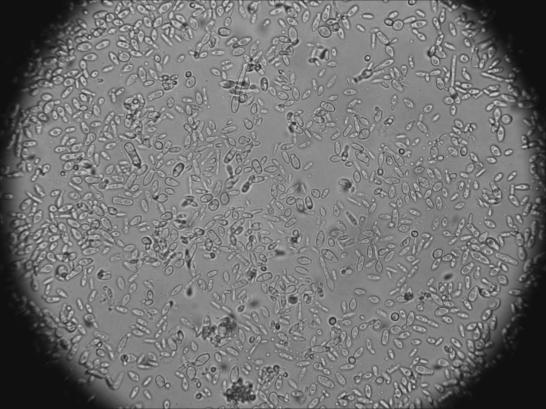
Fig 1: Wyeast's Brettanomyces lambicus (low magnification)

Fig 2: Wyeast's Brettanomyces lambicus (low magnification)

Fig 3: Wyeast's Brettanomyces lambicus (low magnification)

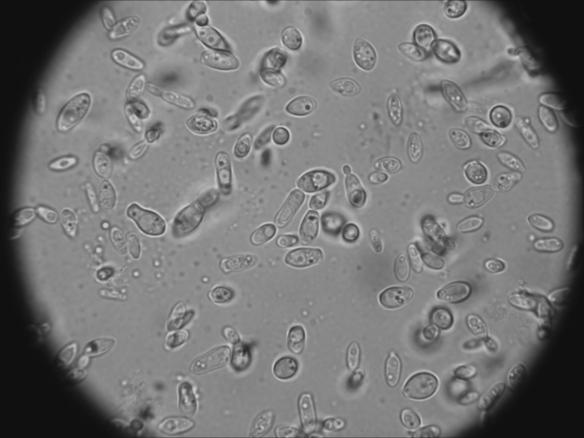
My first impression is that B. lambicus, much like B. bruxellensis, appears in very different shapes. There are boat-shaped cells, elongated cells, and even cells that attach to each other. But very few of the cells are circular like normal brewers yeast. Maybe the circular cells here might be brewers yeast impurities in the Brettanomyces sample. To summarize, B. lambicus seems to look quite different from brewers yeast (Saccharomyces cerevisiae). Lets go into more details at a higher magnification.

Fig 4: Wyeast's Brettanomyces lambicus (high magnification)

The cells seem to have a kind of vacuole (Fig 4). The vacuole can be observed as a kind of compartment in the cell itself. It is much easier to observe in the next picture (Fig 5).

Fig 5: Wyeast's Brettanomyces lambicus (high magnification)

Interestingly, there is something circular in the vacuole. I will come back to this observation later on.

Fig 6: Wyeast's Brettanomyces lambicus (high magnification)

It can be observed now, that the cells have again, like B. bruxellensis, one or two dark spots (Fig 6). I am still figuring out what these dark spots might be. But now back to the most interesting observation from my point of view. I already mentioned, that I could observe some kind of circular structure in the cells vacuole (see Fig 5). One disadvantage of pictures is their snapshot nature. The pictures just represent a short state of a cell. Just have a look the following video I took to see what the cells really looked like for real. Observe what happens inside the vacuole. I have to apologize for the bad quality of the video.

Have you noticed that the circular structure moved in the cells vacuole? Well, I have never observed something like that before. In my opinion there are several possible explanations for such a movement.

– One would be that there is a kind of dynamic movement in the vacuole itself. Much like mixing the vacuoles content in some way. And the circular structure then could be maybe a vesicle with some sort of nutrients in it and swirl around due to the dynamic movement in the vacuole.

– Another explanation, there is a kind of other cell in there. But this seems to be very unlikely to me. I have several reasons to come to such a conclusion. One would be how these cells would have gotten there in the first place.

– Sporulation. Could these structures be spores?

This is very exciting in my opinion. A lot of questions. I have several further investigations in mind to get further information about that circular structure in there. If someone out there has any idea what these structures could be, please comment below. Please comment as well if you have observed such a movement yourself.

What have I learned from the microscopy observations so far?

The observations helped me to understand the different morphologies of the Brettanomyces yeast cells. This can be observed if you look at different microscopy pictures as well. But looking at them yourself is very different. And this helped me to identify several yeasts I harvested from different sources to be Brettanomyces. On the other hand, colonies on the agar plates of the two strains looked very similar and I could not distinct between them. I addition, the colonies of Saccharomyces cerevisiae looked very similar to the ones from the Brettanomyces as well. I could not even distinct between Saccharomyces and Brettanomyces by just looking at the colonies on the Sabouraud agar. Only a microscopy observation can help to make such a distinction. It is therefore inevitable to look at the cells to get an idea what kind of yeast you have.

That’s all so far about the two Brettanomyces strains from Wyeast. Unfortunately, I can’t get my hands on the White Labs strains here. So no further pure strain observations will follow. What I have planned is to write some posts about Brettanomyces in general. And the first post about “Brettology” will be a post about the taxonomy of Brettanomyces. So stay tuned and thank you for your comments!

#46 Festive Pale Ale

Eureka, today a post about a test batch recipe. I have to add first that I am very busy lately and my time for writing new posts is very limited. Sorry for that. I hope to finish the promised posts very soon. And there is yet another matter which has to be taken care of. More about that in a few weeks. But I am really excited about it already… Now back to the original story. My father plans his birthday party for the upcoming summer. And what is a party without some beer, right? So I accepted the challenge to pour some beers there. So, to be sure the beer turns out as expected, I did a test batch first.

Now the question, what is a suitable recipe for a party in the summer? Of course, the beer should be refreshing, easy enjoyable for a lot of different beer drinkers and a decent level of alcohol. A Lager beer seems very appropriate. But since I am not really into Lager beers myself and my experience in brewing such beers is very limited, I decided to go with a Pale Ale with some Cascade and Amarillo hops. By the way, this recipe is not my own but I can’t find the original source anymore.

Recipe: Festive Pale Ale
Numbers: Volume [L] 20 (5.3 gal)
Original gravity 12.2°P
Terminal gravity 2°P
Color Around 4 EBC
IBU 27 IBU
ABV 5.5%
Grains: Pilsner Malt (4 EBC) 3.8 kg
Carapils (4 EBC) 0.2 kg
Hops: Saazer (3.2% AA) 50 g and boil for 60 min
Amarillo (10% AA) 12.5 g and boil for 0 min
Amarillo (10% AA) 28 g for dry hopping
Cascade (5.9% AA) 23.7 g for dry hopping
Yeast: #1056 American Ale
Water: Burgdorf Mash: 10 L (2.6 gal), sparge: 16 L (4.2 gal) @78°C (172°F)
Rest: Mash in @66°C (151°F), 60 min @ 72°C (162°F), 10 min @ 78°C (172°F)
Boil: Total 60 min
Fermentation: Primary 12 days @ 20°C (68°F) in a plastic bucket
Secondary 14 days @ 20°C (68°F) in a plastic bucket and add hops for dry hopping
Maturation: Carbonation (CO2 vol) Added 2 L of wort to beer for carbonation
Maturation time 3 weeks

03/03/12: Brew day. Iodine test was negative after resting for one hour. So I proceeded with sparging and boiling. I had 16.5 L after the boiling with a gravity of about 14.5°P. So I added 5.0 L of cold water, transferred the beer into my whirlpool kettle, added the Amarillo hops and stirred the whole wort to get the debris in the center of the kettle. I then bottled 2 L of hot wort into two 1 L bottles for the conditioning step of the beer. Then cooled the wort down to approximately 20°C (68°F).

I then pitched the appropriate amount of an American Ale yeast (Wyeast’s 1056 American Ale) which fermented another beer before. I used my microscope to determine the cell count of the harvested yeast for the right amount.

03/10/12: Racked the beer into the secondary fermenter and added the Cascade and Amarillo hops for dry hopping. Gravity already at 2°P.

03/24/12: Filled up a keg and added 2 L of the wort for carbonation. The keg will carbonate for approximately seven days and then mature for another three weeks before a first tasting takes place. I will post the tasting in another post soon. Stay tuned!

06/28/12: Tasting

#45 Brett in the house

Eureka, todays recipe is about an experiment I planned a while back ago. As soon as I heard that it is possible to ferment a beer only with Brettanomyces (no surprise here since Bretts are yeasts as well), I planned to try this myself: The following recipe is a beer that has been fermented with Brettanomyces only. I split the batch before fermentation and pitched Wyeast’s #5112 B. bruxellensis in one fermenter, and #5526 B. lambicus in the other one. To have some sort of starches left in the fermenter, I decreased the saccharification rest down to 30 minutes instead of the normal 60 minutes.

Recipe: Brett in the house
Numbers: Volume [L] 15 (4.0 gal)
Original gravity 12.5°P
Terminal gravity 1°P/1.2°P (see description below)
Color Around 4 EBC
IBU 25 IBU
ABV > 6%
Grains: Pilsner malt (4 EBC) 3.0 kg
Wheat malt (4 EBC) 0.8 kg
Acidified malt (5 EBC) 0.4 kg
Hops: East Kent Goldings (5% AA) 40 g and boil for 60 min
Yeast: #5112 Brettanomyces bruxellensis, #5526 Brettanomyces lambicus
Water: Burgdorf Mash: 11 L (2.9 gal), sparge: 13 L (3.4 gal) @78°C (172°F)
Rest: Mash in @66°C (151°F), 30 min @ 72°C (162°F), 10 min @ 78°C (172°F)
Boil: Total 60 min
Fermentation: Primary 11 days @ 20°C (68°F) in a glass carboy
Secondary 7 weeks @ 15°C (59°F)
Maturation: Carbonation (CO2 vol) 2 vol
Maturation time 4 weeks @ 15°C (59°F)

03/03/2012: Brew day. All went according to the protocol above. The starch test was positive after resting for 30 minutes at 66°C. Therefore still some starches left in the wort. Then sparged and boiled for 60 min with the addition of the East Kent Goldings. Then transfered the hot wort into my whirlpool kettle and let the debris settle to the bottom and cooled the wort down to the pitching temperature of approximately 20°C (68°F).

I split the wort in half and filled two 10 L (2.6 gal) glass carboys with approximately 7.5 L of wort (2 gal). Then flooded the carboys with CO2 and pitched the Brettanomyces. So no aeration of the wort. The Wyeast packages of the Brettanomyces already smelled different. The B. lambicus had a very distinct cherry aroma and the B. bruxellensis a really funky smell.

No signs of fermentation after 24 h after inoculation:

B. lambicus fermenter 24 h after inoculation

B. bruxellensis 24 h after inoculation

03/04/2012: And the fermentation is fully active. A lot of bubbling and a nice kräusen on top of the fermenting liquid.

B. bruxellensis 48 h after inoculation

B. lambicus 48 h after inoculation

03/14/2012: Kräusen vanished. I transfered the glass carboys in my cellar to let the fermentation proceed at a lower temperature (@ 15°C (59°F)).

04/21/2012: Bottled the beers with the addition of table sugar to get a carbonation level of approximately 2.0 vol. The B. bruxellensis finished at 1.2°P, the B. lambicus at 1.0°P. I will leave the bottles at 20°C (68°F) for several weeks to carbonate and then store them in my cellar at 15°C (59°F). The first tasting will be in a few months. So stay tuned.

#6 Weizenbock

Eureka, its time for another recipe from the past. Todays recipe is a wheat bock (Weizenbock in German) I brewed back in 2006. I just used Wyeast’s #3068 Weihenstephan back then and I decided one day to brew a wheat bock. So I went with a wheat bock recipe I got from Üelu, called Weizenbock Hell and changed some minor things like the hop variety (originally brewed only with Tettnanger) and the amount of Munich malt (1.7 kg in the original recipe):

Recipe: Weizenbock
Numbers: Volume [L] 19 (5 gal)
Original gravity 15°P
Terminal gravity 5.3°P
Color Around 13 EBC
IBU 24 IBU
ABV >7 %
Grains: Pilsner malt (4 EBC) 1.7 kg
Wheat malt (4 EBC) 3.4 kg
Carapils (4 EBC) 0.3 kg
Munich malt (14.5 EBC) 1.0 kg
Hops: Tettnanger (4.4% AA) 27 g and boil for 90 min
Northern Brewer (9.6% AA) 10 g and boil for 20 min
Yeast: #3068 Weihenstephan
Water: Burgdorf Mash: 19 L (5 gal), sparge: 15 L (4 gal) @78°C (172°F)
Rest: Mash in @45°C (113°F), 20 min @ 43°C (109°F), 30 min @ 63°C (145°F), 30 min @ 71°C (160°F), 10 min @ 78°C (172°F)
Boil: Total 90 min
Fermentation: Primary 10 days @ 20°C (68°F) in plastic fermenter
Secondary None
Maturation: Carbonation (CO2 vol) 5 g of table sugar to each liter of beer
Maturation time > 3 weeks

11/19/06: Brew day number six begins. Prepared all the malts and begun to rest according to the protocol. I did an iodine test after resting at 71°C and the test was positive. So I rested for another 30 min (60 min in total at 71°C) to get a full conversion. The lautering went well and boiled the wort for 90 min with the hops.

Mash is resting

Then cooled the wort down to the pitching temperature of approximately 20°C (68°F) and pitched a package of Wyeast’s #3068 Weihenstephan yeast. Gravity was 15°P.

11/21/06: Had to transfer some of the beer in another fermenter because foam came out of the airlock. A very vigorous fermentation was going on.

11/28/06: Bottled the beer already. Added sugar to get the appropriate level of carbonation. The beer matured for nearly three weeks.

Now about the tasting of the beer. My notices are very limited and I just wrote down that the beer was clear and malty. I did no tastings back then, it was just about the beer itself to be enjoyed. This is very different now because the tastings give me far more information about the recipe than anything else. But I assume that this beer turned out pretty well because I did another wheat bock after this batch (#7 Zelebrator Weizenbock). So, if anyone out there gives this brew a go, please let me know how it tastes like…

#9 Agar plates (Wyeast’s Brettanomyces lambicus)

Eureka, this is yet another post about Brettanomyces and agar plates. Todays post is about the results of streaking a pure Wyeast’s Brettanomyces lambicus culture on Sabouraud agar plates. I first streaked some liquid from the Brett package on a plate and let it incubate for six days.

Fig 1: Wyeast's Brettanomyces lambicus on Sabouraud agar after six days of incubation

There are some bigger circular colonies and smaller ones visible (Fig 1). The bigger ones are circular, off-white, glossy, even and convex. To check if there are two different morphologies (big and small colonies) as seen in Fig 1, I picked a small colony and streaked it on a new plate.

Fig 2: Wyeast's Brettanomyces lambicus on Sabouraud agar after eleven days of incubation

And there is just one kind of colony visible (Fig 2). These colonies are off-white, glossy, more or less even, circular or wavy and convex. So very similar to the bigger ones as seen in Fig 1. Therefore both colonies (big and small in Fig 1) are the same. Some margins of the colonies were not even anymore and had a wavy margin. But this can even be observed in pure Saccharomyces cerevisiae colonies.

To summarize, Brettanomyces lambicus from Wyeast form off-white, glossy colonies on Sabouraud much like Saccharomyces cerevisiae. So no way to differ between Brettanomyces and Saccharomyces. I already observed the same with the colonies from Brettanomyces bruxellensis. And even the colonies from both Brettanomyces (B. bruxellensis and B. lambicus) look very similar as well. Similar observations were made by Jason from sciencebrewer. This concludes, Sabouraud agar is really not useful to differ between Saccharomyces and Brettanomyces. But this was not the goal of these plates in the first place. I just wanted to see how the different Brettanomyces look like on the plates. Further experiments are necessary to find an agar to differ between Brettanomyces and Saccharomyces. Nevertheless, for the upcoming experiments, it is useful to know how the colonies could look like in the first place.

I am still planning my next experiments concerning Brettanomyces so it could take a while until further results are available. But there will be other posts about Brettanomyces in the future. Some of them will focus on the morphology, some about techniques how to differ between them such as using PCR, another post will be about the taxonomy of Brettanomyces and other posts will be more about the genetics of Brettanomyces. Basically more about science behind Brettanomyces rather than experimental data. I try to make them as easy to read as possible and hope these posts will be interesting to some of you as well.

Tasting: #41 Jubilee Porter

Eureka, its time for a tasting. Todays beer is the #41 Jubilee Porter I brewed back in December 2011. The beer matured for nearly three-month in a keg now, and its time for a tasting. The temperature of the beer was somewhere near 12°C (54°F).

Aroma: A lot of different aromas come into my mind: malty and caramel notes, honey, no roastyness or chocolate notes. No fruity notes. Has a kind of vintage smell like the Guinness Draught. But a very clean aroma. No off-flavors detectable.

Appearance: Ruby red, black, clear but can’t look through the beer, nice frothy 1 finger tan-colored head. The beer looks pretty nice.

Flavor: Again some malt and caramel notes. And a hint of bitterness is detectable as well. Nice balance between the bitterness and the malt backbone. No roasty or chocolate character. Really easy to drink.

Mouthfeel: Light to medium body, average carbonation level (much like a real Ale poured in the UK) and it is pretty easy to enjoy. The beer is pretty dry and finishes with a lightly bitter aftertaste. A real thirst quencher for sure.

Overall Impression: Well, this is a very easy drinkable beer for sure. And still has some very unique characteristic aromas and flavors. It is a very solid brew and I could not detect any off-flavors. I expected to taste some chocolate notes from the chocolate malt. But I could not detect any.

Lets summarize, this brew is really enjoyable. And I am not the only one who enjoys it. A lot of my friends appreciate it as well. I will give this recipe a go again for sure. The next step would be to do some experimenting and tweaking the recipe. I could try to increase the addition of the chocolate malt, maybe add some smoked malt as well to give it a more unique character, dry hopping, another yeast strain, add some wood chips… Luckily, I have a lot of ideas what to do with this particular brew. Cheers and thanks for reading. Please let me know if my tasting notes are of any use for you.