Eureka, this post starts the yeast basic series. Today, we are talking about a basic technique how you count yeast cells to determine the cell concentration in a yeast starter or calculate the amount of yeasts you have in total. This method is only for those of you having access to a microscope. However, there is another easier technique to get an idea about the yeast concentration. Will cover this technique in a future post. Lets begin with the microscope based technique.
Why count the yeast cells?
Counting cells is a technique to determine the cell concentration in a liquid. Imagine you want to make a 5 gal (18.9 L) batch of beer with an original gravity of 1.048 (12°). How much yeast do you need to get a healthy fermentation? This can be calculated by different yeast calculators such as the one from J. Zainasheff (mrmalty.com). The right amount of yeast would be 170E9 cells for this example. Lets assume you do not have the right amount of yeast available and you need to propagate the yeast with starter(s). You could even harvest yeast from a previous batch to ferment another batch. The question now arises, how can you be certain to have the exact number of yeast cells after the propagation step(s) or how much of the yeast cake do you need to harvest to get the right amount of yeast cells? This question can be answered with a cell count.
What do I need to count yeast cells?
First of all, you need a counting chamber. A Neubauer-improved counting chamber works very well for yeast cells. More about the counting chamber later on. Second, you need a microscope with a magnification greater than 400x. Third, equipment to dilute the yeast samples. Pipettes and graduated cylinders work very well.
What is a counting chamber?
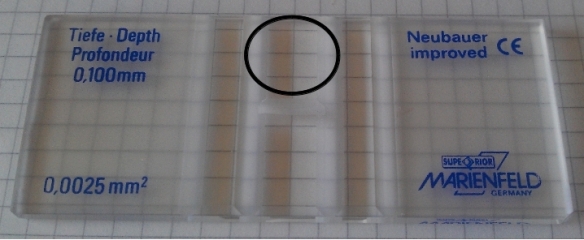
A counting chamber is a special glass slide (the size of a normal microscope slide) with engraved squares and a cover slip (not shown). The squares are located in the middle of the chamber (indicated with the circle in Fig 1).
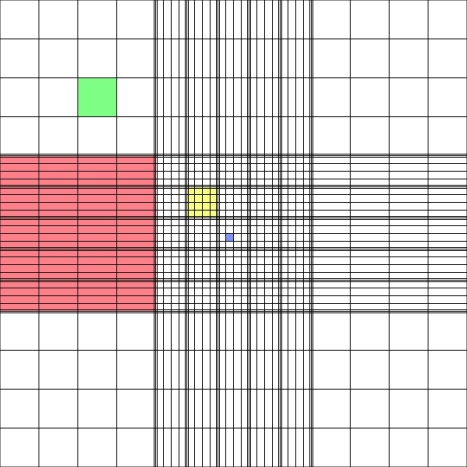
Now about the squares of the counting device. There are nine big squares (red). In the red square are again 16 squares (green). There are yet smaller squares (yellow and blue ones). The counting chamber can be used for different cell sizes. If you have bigger cells such as leukocytes, you could count them in the red and green squares. In case of yeast cells, you can use the yellow squares because these cells are smaller than leukocytes.
When you prepare the chamber, you cover the squares with a cover slip. The gap between the squares and the cover slip is exactly 0.1 mm. The area of the red square equals 1 mm2, a yellow square equals 0.040 mm2 and therefore equals 4 nL (= 4 nano liters) of volume with the cover slip mounted on the counting chamber. The squares therefore represent a very small volume. Counting the cells in these squares can give you information about the cell concentration in the end.
How do you prepare and use the counting chamber?
Please consult White Labs homepage and have a look at the following video. Please notice the particles shown in the video are about 100 times bigger than yeast cells. For these particles the red squares are the most useful ones. For yeast cells on the other hand, use the yellow squares.
Two more things. First concerning the cover slip. In the video the cover slip is just laid on the counting chamber (synonym for hemacytometer). I breathe on the cover slip first and then lay it on the counting chamber. If you do it right you should see some Newton’s rings. If these rings can be observed the gap between the counting chamber and cover slip is tight.
Second concerning the counting rules. As mentioned there are several accepted ways to do so. I learned to count the cells touching the tripled line on top and the right side. Cells touching the lines on the bottom and the left side are not counted. More about that later on. So far about the principles.
Lets make an example
You made a starter (1’000 mL) and want to know how many yeast cells you have in there and check if you have enough yeast cells to ferment your batch.
1. You first dilute 1 mL of the yeast starter with 99 mL water or isotonic sodium chloride solution (9 g sodium chloride dissolved in 1 L of water). This is a 1:100 dilution step. If you expect a low yeast concentration, a 1:10 dilution could work as well or even load the chamber with undiluted starter.
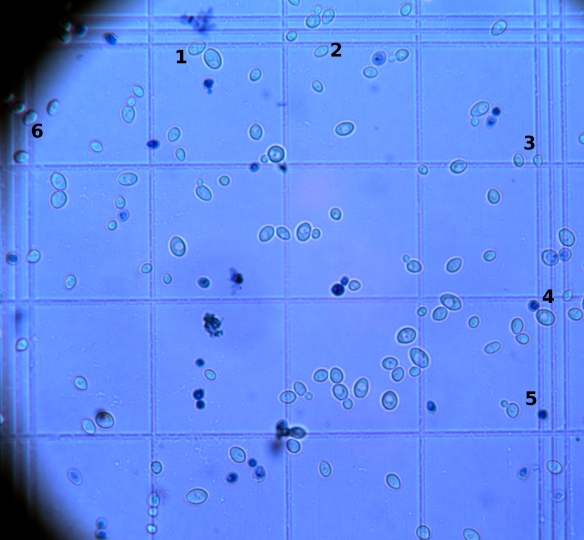
2. You then load the chamber and it looks like the following picture:
What you can see here are mostly yeast cells. Don’t bother about the blue color. This is how your yeast sample in the counting chamber could look like. Now, please notice the triple lines on the left side, top and right side of the picture. The bottom one is not visible in the picture. But there are some of these lines at the bottom as well. If you compare it with the lines in Fig 2, you can see that you are looking at a yellow square with the 4 x 4 blue squares. The triple lines are the border lines of the yellow squares. Next thing to do is count all the cells in the yellow square (between the triple lines). Please have a look at the video mentioned above how you count the cells. As mentioned above, there are several rules about how to count the cells. My technique is to count only the cells touching the lines on top and the right side. Lets have a look at the picture above. In the second square on the top left, there is a cell touching the tripled line (marked as 1). This cell is included in the count. The cell marked as 2 and 3 are included as well. The two cells in proximity of 4 are included as well. The cell below the 4 is still in the square. The cells above the 4 are not included since they are not in the square. Next dark blue cell 5. If you look at the cell it is just at the border. I guess here you can decide whether you include the cell or not. And to finish, cell number 6 is not included since it touches the lines on the left side. I hope this helped to understand how to count the cells.
Lets say you counted a total of 65 cells. Next you count another four of these squares. In total five yellow squares. Lets say you counted 60, 70, 62 and 55 in the next yellow squares.
3. Add all the numbers together: 65+60+70+62+55 = 312 cells. You therefore have 312 cells in 20 nL (since one yellow square equals 4 nL and you counted five in total).
4. Multiply 312 by 5 to get the concentration in 100 nL. In this case you have 1560 cells in 100 nL. Or 15600 cells in 1 µL.
5. Then multiply the 1560 cells with 10000 to get the concentration per mL (conversion from 100 nL to mL). In this case 1.56E7 cells in 1 mL.
6. Last thing to do is to include the dilution of 1:100 from the beginning. Multiply the 1.56E7 cells per mL with 100 to get the final yeast concentration of 1.56E9 cells per mL. This is the yeast concentration you have in your 1000 mL starter. In total, you now have 1.56E12 yeast cells in the yeast starter (1.56E9 cells per mL x 1000 mL = 1.56E12).
Coming back to the 5 gal (18.9 L) batch of beer with an original gravity of 1.048 (12°). We previously calculated that you need 170E9 yeast cells for this batch. Your starter has a cell concentration of 1.56E9 cells per mL. 170E9 cells divided by 1.56E9 cells per mL gives you a volume of approximately 109 mL. You therefore need to pitch 109 mL of the yeast starter to have the right amount of yeast cells. In fact, your yeast starter would have enough yeast cells to ferment approximately 170 L (45 gal) of a 1.048 (12°P) wort.
To summarize, the best way to get an idea about the yeast concentration of a starter or a yeast slurry is to use a counting chamber and count five yellow squares. Add all the numbers together and multiply it by 50000 to get to the concentration in cells per mL. And don’t forget the dilution factor. Simple as that.
In my opinion, if you count yeast from a starter of a fresh yeast slurry, you do not have to worry about the yeast health. Just count the yeast cells and get an idea about the yeast concentration. On the other hand, if you count yeasts which are not the healthiest anymore, it seems advisable to determine the viability of the yeast as well. This means, get an idea about how many yeast cells are dead. More about the viability test in a future post. Stay tuned for future posts and please let me know if something is not clear.


Allow me to tap into your scientific expertise… with a yeast specific question, but temperature and health, not counting. I had a little temperature catastrophe with my new Wyeast 3726-PC Farmhouse Ale Yeast. We’ll just say household circumstances got in the way of proper monitoring and my slow temperature ramp ended up in a slow climb up to a whooping 35°C. That’s 6°C over the peak recommended range for the yeast. The good news is, it still finished off all the way down to 1.007. I haven’t bottled this yet, but I’m remotely hopeful that the batch is salvageable based on the FG and aroma/taste from gravity sample… at least I hope it won’t be a dumper. I had planned to use this yeast for 2 more batches of Saison, and Autumn and a Noel.
My question is, having been subject to that peak temperature, would you still re-use this yeast for subsequent batches? Or would you deem it too stressed out and ruined?
Hi Darryl,
first of all I hope your beer turns out great anyway. Concerning your re-use question. Let me say that I do not have any knowledge about this issue and it is really hard for me to make a decision. Some thoughts:
– As the yeast can manage 29°C (as mentioned by you and Wyeast), 35°C is not far away from that. If you ferment your beer at 29°C, I assume the core in the fermenter is warmer than 29°C. Lets say it is 3°C above, about 32°C. Again not far away from 35°C. I would assume that this particular strain can manage 35°C.
– If the temperature was too high for the yeast, I would expect a low amount of viable cells (living ones) since some of the cells died. At the end, this would have similar effects as underpitching. Since you had no problem during the fermentation, I would expect the most cells are still in order.
To summarize, I would re-use this yeast based on your results and the yeast strain. If this would happen with a different strain (lets say an American Ale strain) I would not re-use it again. Observe your second batch. If the fermentation goes without any troubles, you might be save. However, don’t be too sure about it. Some off-flavors and troubles might occur in the future although the fermentation went smoothly.
All the best and cheers, Sam
Thanks Sam, I appreciate the feedback and opinion from the scientific point of view. I’ll post how things go on my blog.
I’m a little behind right now on my blogging and updates.
and Cheers! I’m actually having a wiezenbock now as I read your old recipe post!
I will read about your results on your blog then. Actually, I did a Saison batch yesterday and use the 3726 Farmhouse Ale strain as well. My fermenter is in my shed now where it should be warm enough to get to around 30°C. Will see. Cheers!
Hi, thank you for your blog, I really appreciate your scientific-oriented approach…
However, I think your are confusing µl (microliters) and nl (nanoliters) in this article:
1 µl is 1 mm^3 (cubic millimeter), and as a red square has an area of 1 mm^2 with a liquid depth is 0.1 mm, the liquid volume above such a square is 0.1 mm^3 = 0.1 µl = 100 nl.
The same reasoning applies to the yellow square: 0.04 mm^2 area by 0.1 mm depth is equal to 0.004 mm^3 = 0.004 µl = 4nl (not 4 µl).
Fortunately, your error cancels when converting back from cell count to cell concentration, as you multiply by 10 000 to convert from 100 µl to 1 ml (should be 10 as 1 ml is 1000 µl).
This reduces basicaly to a notation error: we should read nl instead of µl in the whole article, and then all numerical values are correct.
Cheers,
Hi, thank you very much for pointing this out. You are absolutely right, it should be nL instead of µL. I just changed it in the post above. How embarrassing…
Thanks for reading through my post and I really appreciate your comments. Cheers
Thank you for the tutorial. However, you have one more conversion error. In step #4, you state that 1560cells/100nl is equal to 156ul, which is incorrect. 100nl is smaller than 1ul by a factor of 10, giving 15600cells/ul. Fortunately, you continued your math using the 1560cells/100nl number, giving you the same result in the end. I thought I’d point it out bc I usually count with a direct conversion from ul to ml, and I thought others might be similarly confused. Cheers!
You are absolutely right – this is an obvious error. Thanks for pointing that one out – changed.
Hi i’m a french brewer and I wanted to say a big thank’s 🙂 Your articles are of an incredible quality ! Thank-you for sharing your indeniably deep knowlege in such and understandable way
Keep experimenting and keep brewing,
Au revoir ! 😉
Hi ElsassBrewer, thank you for your kind lines. I will keep on experimenting 🙂
Pingback: Fundamentals of Sour Beer Fermentation - Sour Beer Blog
why do we expect to see some proportion of dead cell in cell culture
Simply because yeast is dying at some point. After some divisions, they cannot further divide and die. And there is always a proportion of dead cells in your cell culture.